Showing posts with label purple/brown silk covered hat. Show all posts

Friday, July 8, 2011

Threaded Bliss

A Chintz Quarter Back Gown,
1780-1785

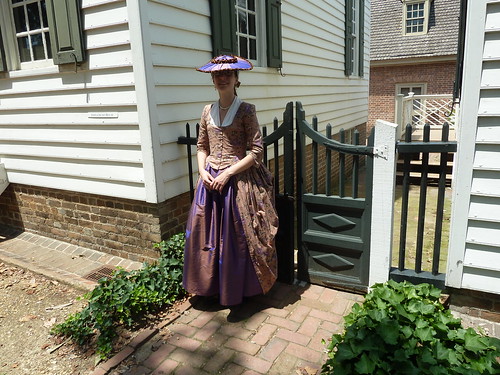
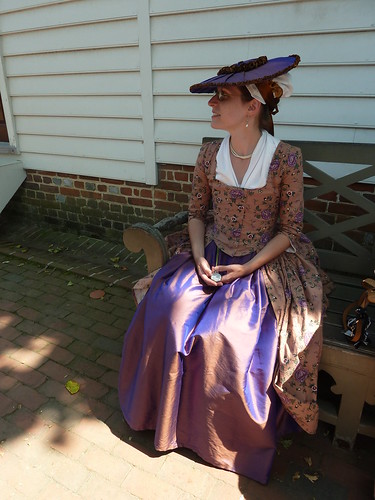
Ashley on the Palace Green at Colonial Williamsburg,
July 2011.

Waaaaaaay back in February, we did a Threaded Bliss post that featured a purple and brown changeable silk covered hat.  Waaaaaaay back in February, we promised we'd share the gown it accompanied...in March.  Well, it's not March any longer...but five months later, at long last, here it is!

The Pattern: This gown is a conglomerative affair in terms of patterning.  The quartered back pieces are copied exactly from the gown on page 39 of Janet Arnold's Patterns of Fashion 1; Ashley has a remarkably 18th-century figure, so patterns taken directly off originals fit her perfectly more often than not (this makes doing exact reproductions of many things feasible and even sensible, huzzah!).  In this case, however, the front pieces of the original gown were slightly off in too many places, so I started from scratch there and simply draped them like I usually do.  I initially cut the shoulder straps as one with the bodice fronts (as in the original), but somehow, somewhere, something got off and I ended up having to snip them off and do them as separate pieces (which is also perfectly accurate and acceptable, but I'm noting it just because it's another way in which this gown diverges from the original Arnold reference).  The sleeves are also taken from the Arnold gown (one day I'll get the knack of draping them myself...one day...).
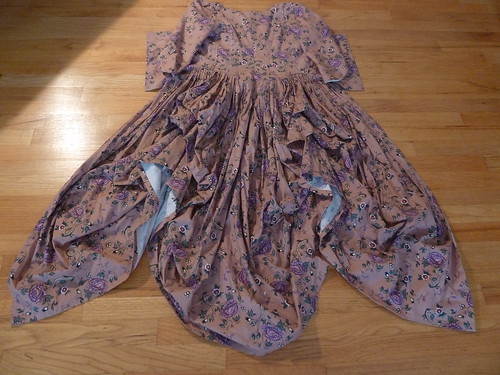
P1070617
The back of the gown, laid flat.  The skirts are tied up "a la polonaise,"
but they can of course also be worn straight.

Construction Details: At long last, I've remembered to snap some in-progress photos of the construction process on this gown.  Here, too, I am copying the original using the details offered in Arnold on page 39, which specifies that "each piece of the bodice is lined with white linen and made up separately...All the pieces of the bodice are then sewn together when they are complete."  This is a pseudo-tutorial, not quite as detailed as a full-fledged step-by-step, but definitely more in-depth and photo-heavy than past construction notes have been.

Because each back piece is finished before it is assembled with the others, the first step is to turn under the seam allowances of both the linen lining and the chintz.  Both of my fabrics creased nicely, so I didn't feel the need to baste the allowances down on either before putting them together, but you certainly can to hold things in place if you like.
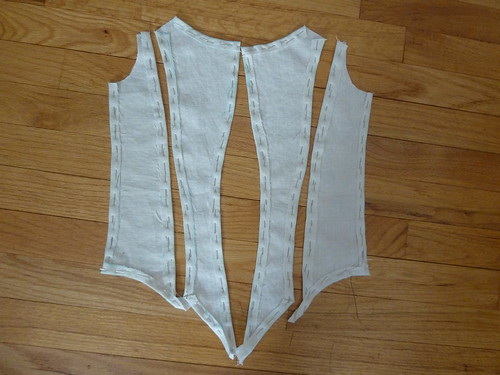
P1020838
The "quartered" back lining pieces with their seam allowances folded under. 
The same is then done to the corresponding outer pieces.

The seam allowance on the lining pieces should be turned under ever so slightly more than it is on the chintz, so that the edge of the chintz remains visible around the edges of the lining.  The lining pieces are then placed against the chintz, wrong sides together, and the two stitched together using "le point a rabattre sous la main"
(which will look like a tiny running stitch on the outside and a hem stitch on the inside; see Costume Close-up for details on this stitch).  It is unclear from Arnold's description what kind of stitch was used in the original to attach the lining to the outer fabric; I experimented with using a plain running stitch, but I didn't like the look and opted for the old faithful Costume Close-up stitch in the end.  The armscye edges of the two side/back pieces do not need to be finished in this step because they'll be hidden once the sleeves are attached.
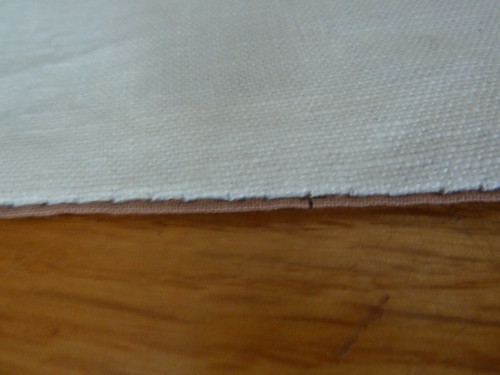
P1020844
A finished edge of one of the back pieces, showing the lining attached to the chintz.
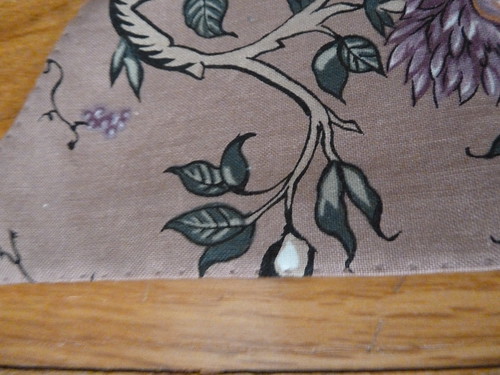
P1020843
The other "right" side of the finished piece above, with the tiny running stitch of
"le point a rabattre sous la main" visible along the edge.
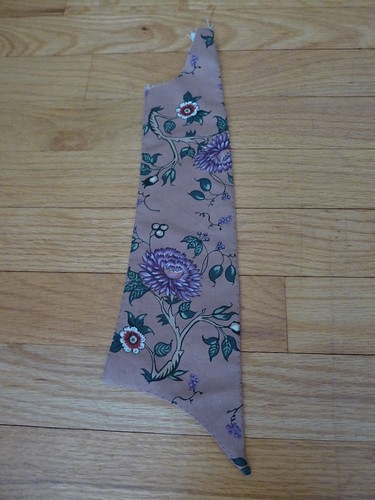
P1020840
The finished piece, which is the left back/side piece.  The
unfinished armscye edge is at the upper left of the piece.

Once all of the four back pieces are finished, they are then whipstitched together, catching only the outer fabric.  When the pieces are pressed open, this allows the seam to lay perfectly flat.
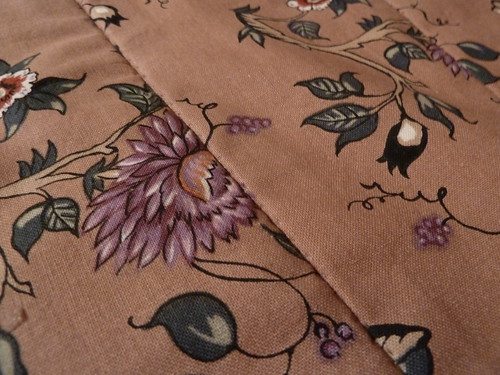
P1020862
Two back pieces, joined with whipstitches.  Because the whipstitches catch
only the very edge of the pieces they join, you can see the "le point a rabattre
sous la main" stitches on either side of the seam.
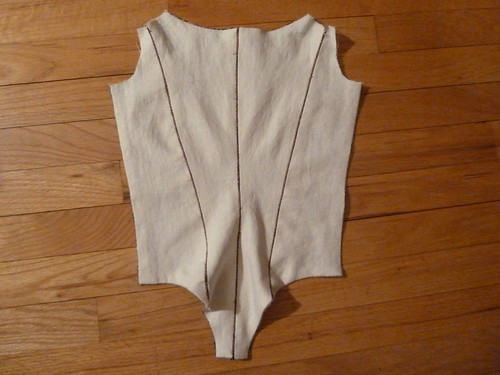
P1020865
The finished quartered back from the inside. 
(The "wave" at the bottom accomodates the bum pad)

The front bodice pieces are then finished in the same way as the back pieces, except that the side seams are left open about 2" from the sides so that the chintz can be lapped over the side/back pieces and stitched down, and then the lining folded on the inside and whipstitched into place to conceal the seam.  On my quarter back gown, I finished the front/side edge and attached it in the same way as the back pieces with the whipstitched seam; on this example, I elected to do a lapped seam at the front/side instead, just for variety's sake.  Both options are documented.
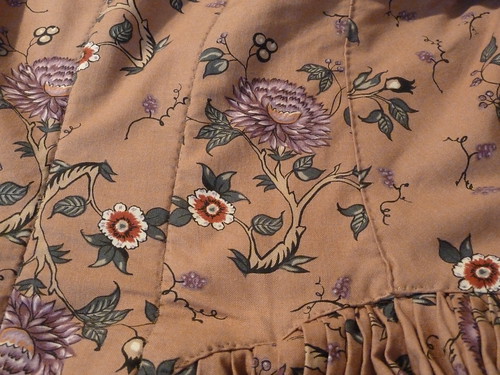
P1070627
The finished bodice from the right back/side, with the whipstitched quarter
back seams on the left of the photo and the lapped front piece on the right.

Next, the sleeves are assembled using a lapped seam.  After their bottom halves are backstitched to the gown's bodice, the sleeve caps are pleated into place directly on Ashley's shoulders.  The shoulder strap pieces are then laid over top to cover the unfinished sleeve caps and topstitched into place.

The final step is pleating the skirt.  Because the bottom of the bodice is already completely finished, this is a fairly simple process, where the upper edge of the skirts are folded to shape and left to hang free, unfinished, inside to help poof out the skirts. Period gowns employed this technique because it allowed for easier alterations in the future by leaving the maximum amount of fabric safely unspoiled by scissors.
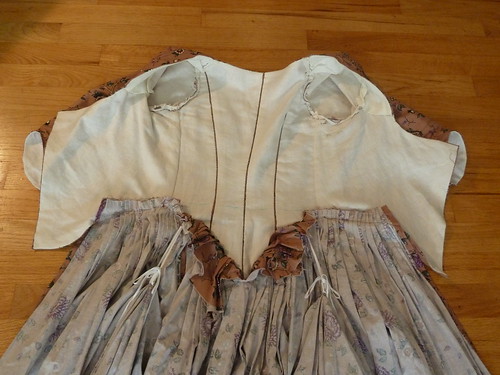
P1070631
Interior of the gown.

Double polonaise ties are sewn to the inside of the skirts so that they can be worn draped up once, twice, or not at all.  In all of the photos here, they are drawn up using two sets of loops and a tie on each side.
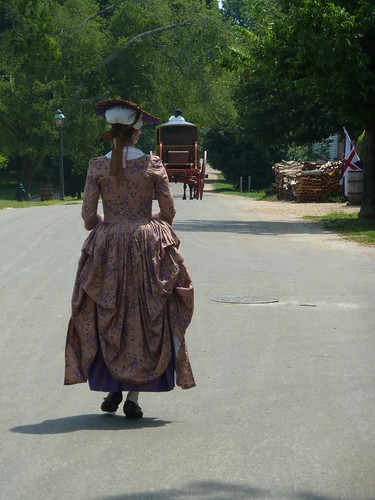
Brown chintz gown, 1780-1785
Colonial Williamsburg, July 2011.

The Fabric: In scale and pattern, this cotton chintz by Windham is a reproduction of a 1770s cotton print in the collection of Colonial Williamsburg.  The colorway, however, is not original; as with the DAR fabric we used on this gown, this print, too, was produced as part of a quilting line and thus released with multiple altered color variations.  The end result is that because of the altered dark ground, this print is not (strictly speaking) appropriate for a 1770s gown, but rather more similar to the patterns and colors that became fashionable in the early to mid 1780s.  We were thus very careful to style the gown to reflect the date of the fabric.
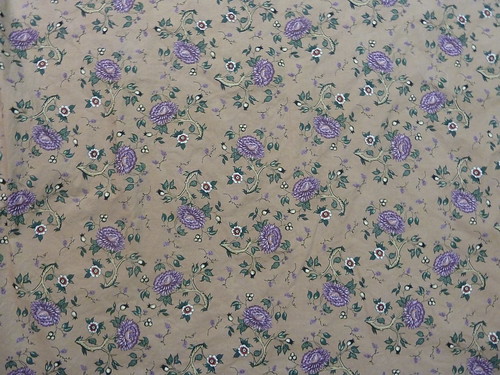
P1020878

Finishing the Look: Because a chintz like this, which features six different colors, would have been just as much a luxury fabric as silk, it is entirely appropriate to pair this cotton gown with a silk petticoat.  Ashley made a purple and brown changeable silk taffeta petticoat, which compliments the color tones perfectly.  The fabric was another incredibly lucky Ebay find from a seller in Hong Kong.  There was also just enough left over to cover the hat we shared earlier.

Underneath the gown and petticoat, Ashley wears a linen shift, fully-boned stays, a bum pad and linen underpetticoat to help achieve the fashionable early 1780s silhouette, and a white linen lawn neckerchief.  It's tough to see in the photos, but she also has pearl earrings by Janice Erickson Smith, a hand-knotted pearl necklace she made, secured with a pink silk ribbon, and a silver pocket watch suspended from her waistband on another silk ribbon.  The accessories were chosen to reflect the social status conveyed by the fabric choices.
Brown chintz gown, 1780-1785
Colonial Williamsburg, July 2011.

Brown chintz gown, 1780-1785
Colonial Williamsburg, July 2011.

I ran out of room for photos in this post, so if you'd like to see more, be sure to check out this project's flickr set!

Sunday, February 20, 2011

Threaded Bliss

An 18th Century Covered Hat

This hat is part of a new 1775-1785 ensemble we're working on that will be premiered in a Threaded Bliss post in March.  Until then, we'll offer you this teaser: a changeable silk covered hat.  New to this "issue" of Threaded Bliss is also a detailed tutorial to aid you, gentle reader, in making your own fashionable accessory.  Enjoy and let us know if you have any questions!  And don't forget to let us see what you create!


The pattern: Straw hats can be covered in a variety of ways.  One way is to trace a circular pattern directly from the hat and construct a pouch in which the hat is inserted; a smooth, flat surface on both sides of the hat, brim and crown, will be the result.  This method is detailed by our friend Laurie of Teacups in the Garden in her post about the techniques she learned in a recent class at the Colonial Williamsburg Costume Design Center.  Another method, described below, instead takes strips of fabric and fiddles with them by variously pleating, gathering, tugging, and smoothing until you achieve the look you like best!  In other words, there is no "right" or "wrong" way to do a covered hat.

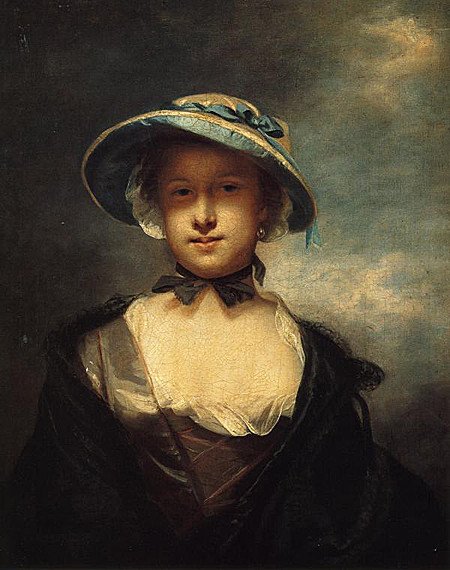
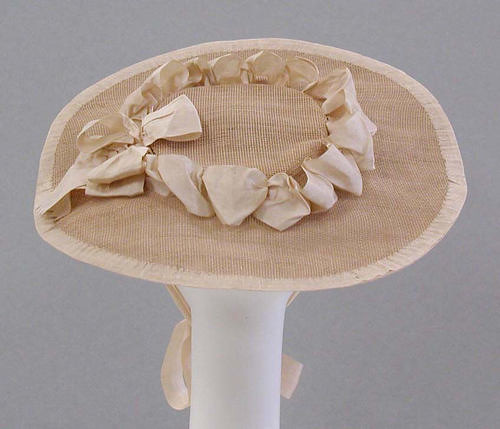
Inspirations: There are many period images of covered hats available online, along with a handful of extant examples.  Here are a couple of our favorites and inspirations for our purple silk hat:

Catherine, Lady Chambers (Joshua Reynolds), 1756.

The top of the hat in the painting above (or at least the crown) appears to be pleated.  The underside is covered in a different color silk, which is also used to form the poofs and the bow that decorate the hat's crown.

A covered silk hat from the Met Museum (acc. no. 1984.140), dating to 1760.

In this 1760 example, ribbon poofs and a big bow surround the low, wide crown of the hat.  The brim is edged with matching ribbon, which also forms the ties.  Be sure to visit this item's detail page because there's a great glimpse of the underside of this hat.

The Angelic Angler, 1780s.

This print above I love both because of the title and subject matter, and because it just shows what fun you can have with designing and decorating hats.  This later style (1780s) uses different materials to decorate around the crown and the edge of the brim, and features the poofed top fashionable during that decade.  And just for the record, I want her shoes.

Construction details: I have, at long last, remembered to take in-progress photos as I've worked on the hat, so to honor that achievement (small as it is!), I'll offer some step-by-step instructions on the "free-handed" method of hat-covering.

1) First, cut a square, circle, or rectangle to cover the crown of the hat.  If you want pleats, go with the rectangle; if you're going for a gathered, poofy look, the circle is best, and if you want a smoother finish, do the square and treat it as you would a fabric-covered button (in other words, yes, a round crown CAN be made to fit into a square of fabric!).  Finish the crown of your hat before you move on to the next step.

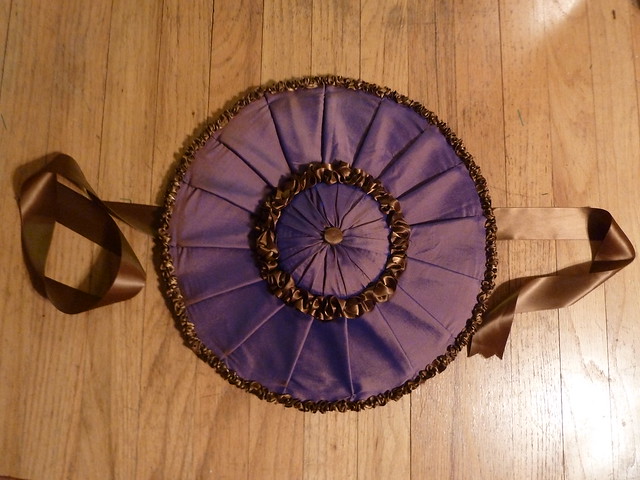
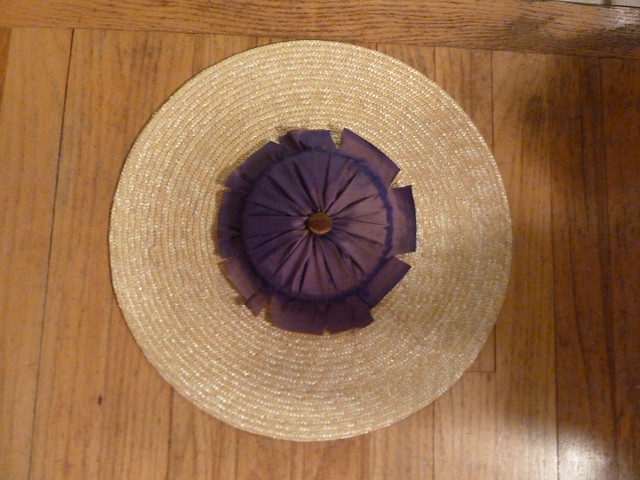
The completed crown, covered in a pleated strip of fabric
gathered at the center point.  The edges are snipped so
that they will lie flat beneath the brim covering.

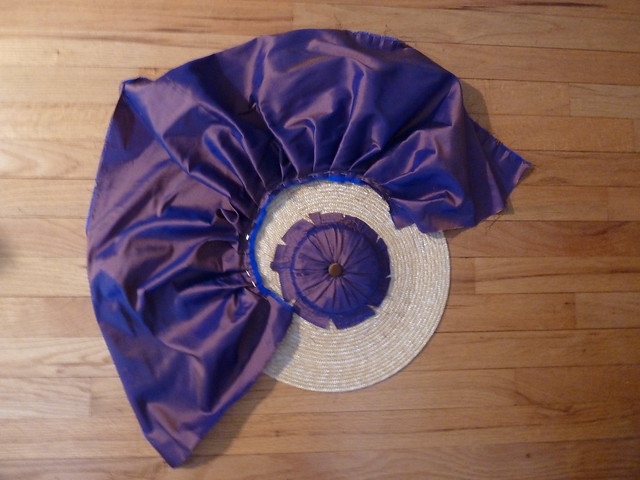
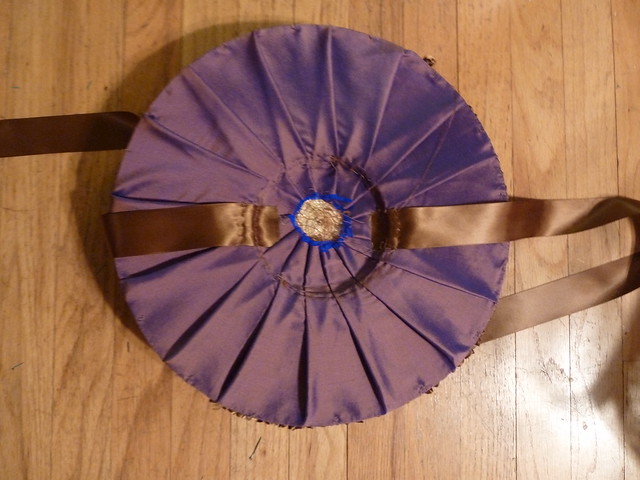
2) Next, cut a rectangular strip of fabric the width of your hat brim.  Make it about a yard long to begin with, though you'll probably end up needing to add to it as you proceed with step three.  If you want only the top portion of your hat brim to be pleated or gathered, then make the width of your fabric strip as wide as the top of the brim only (plus seam allowances, of course).  If you want the underside of the brim to echo the top, you can either double the width of the strip so that it wraps fully around the edge of the brim to reach the underside of the crown, or do the top and the underside separately.  It just depends on how much fabric you have to work with, and how fiddly you're in the mood to be. Doing the top and the bottom separately is a little easier when you're doing something like evenly-spaced pleats, I think. Of course, that being said, I did this example with a single strip that covers top and bottom, but that was just a personal choice.  If you'd prefer a smooth underside, trace your hat to form a circular pattern, add seam allowances, and cut out the center hole where the crown will be.

The pleated strip of fabric, ready to be attached at the base of the crown.

3) Measure the circumference of your crown and add a comfortable seam allowance to that figure.  Pleat or gather one side of your fabric strip to match that measurement.  Play with the size of your pleats or the fullness of your gathers until you achieve the look you like best.  Again, there really are no set rules with this!

4) Stitch the pleated or gathered strip around the crown.  Don't worry about finishing the edges because they will be covered by trim.

5) Arrange your fabric from crown base to edge.  You can do angled pleats like mine, straight and even pleats, pleats of different widths and angles mixed together, overlapped pleats - go with whatever your imagination suggests to you!  If you've instead gathered your fabric around the crown, figure out the best tension for the fabric as it extends out towards the brim.  Stitch down your pleats or gathers close to the edge of the brim.  If you've done some elaborate or very tiny pleating, you can stitch them down in the center of the brim as well.  Don't be shy about allowing your stitching to show; the 18th century (unlike the 20th and 21st) wasn't picky about it being visible, so your hat certainly won't be considered "sloppy" if we can see your stitches!


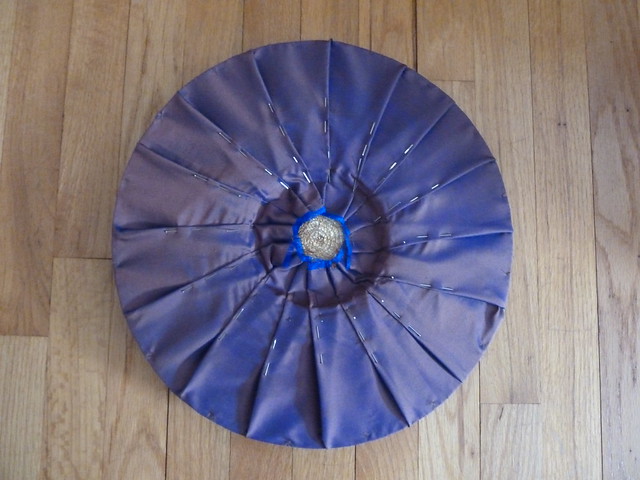
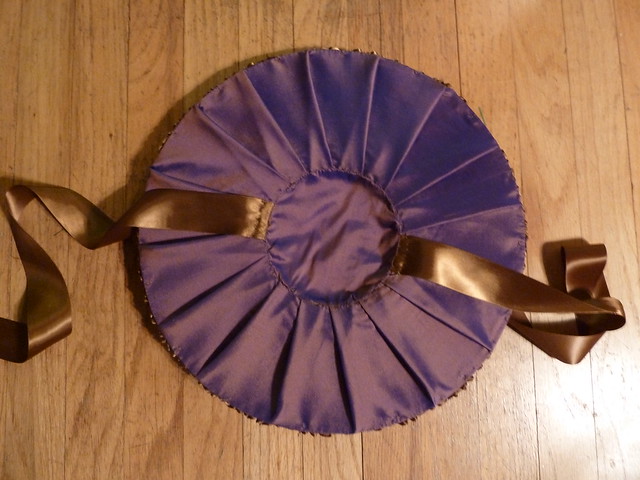
6) Complete the underside of your brim.  If you want the bottom to mirror the top, repeat as above.  If you've chosen to do a smooth underside, apply your circle at the brim edge and underneath the crown.  If you've done your top and bottom separately, be sure to make your stitches close to the edge of the brim, where they can be obscured by trim.

The underside of the hat with the pleats pinned in place.

7) Attach your ribbon ties to the underside of your brim.


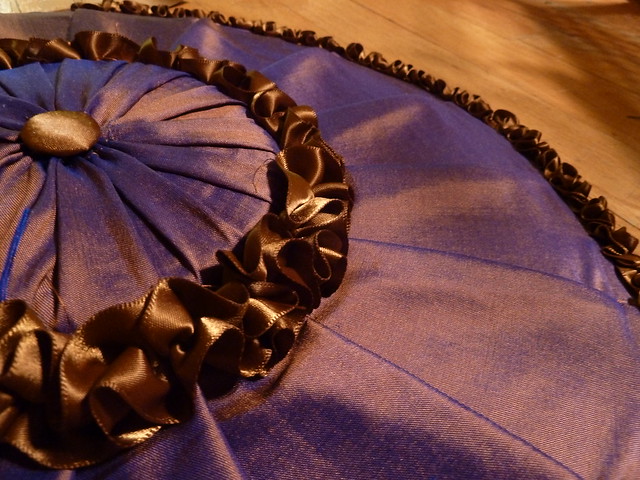
8) Decide on the trim to surround your crown and sew it down.  You can do ruched trim (as in this example), knife-pleated or box-pleated trim, bows, loops, poofs, or simply leave the ribbon smooth and wrap it around.  You can use matching or coordinating fabric, ribbon, braid, or flowers.


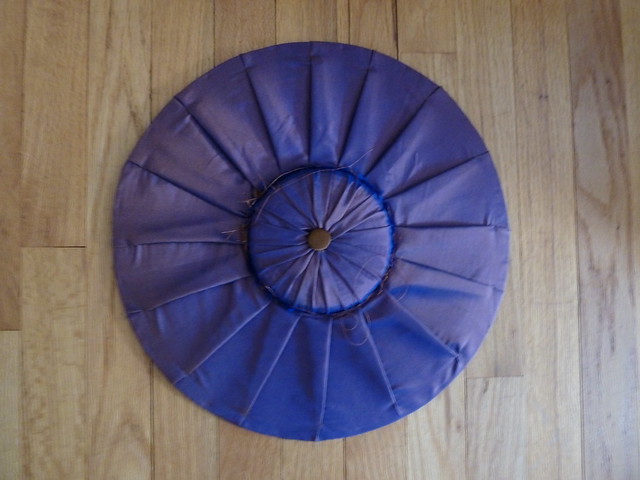
9) Cut a square a little larger than the size of your crown.  Fiddle with this square until it lays smoothly inside the underside of the crown and stitch it down.  You can cover the seam with ribbon if you like, or you can leave it exposed.  Once it's on your head, of course, no once will see it, so it depends on how finished you personally need your projects to feel.  I left mine plain with the stitching exposed (whatever that says about me!).

The completed underside of the hat, with the edges of the ribbons
secured beneath the crown's lining.

10) Decide on your trim for the edge of the brim.  It can mirror the style or width of trim you've used for the crown, or it can be completely different.  Once you're done with this, congratulations!  Your hat is complete!


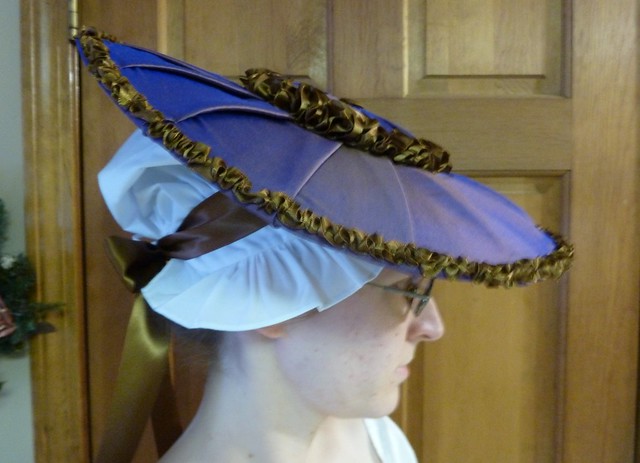
The fabric: A changeable purple and brown silk taffeta.  The ribbon trim is milk chocolate brown satin in two different widths: 1" for the ties and the ruched crown trim, and 1/2" for the ruched edge trim.  The wooden button is covered in a small square cut of ribbon.  The hat blank is from The Silly Sisters.

Finishing the look: In the eighteenth century, a hat (covered or not) would have (almost) always been worn over a white cap.  This particular hat was made to coordinate with a new quarter-back gown.  One thing to remember when making and wearing silk-covered hats is to be sure the "fanciness" of your hat compliments that of your gown.  A silk hat, for instance, would never be worn with a plain wool or linen gown, but rather would have been reserved for a silk or expensive cotton ensemble.


Additional in-progress photos can be found on this project's flickr set.  Stay tuned for the gown and completed ensemble coming in a couple weeks!