Sunday, February 20, 2011

Threaded Bliss

An 18th Century Covered Hat

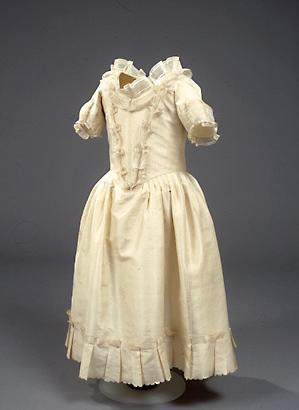
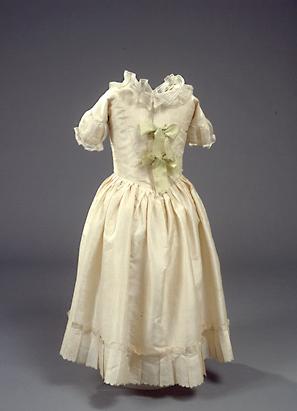
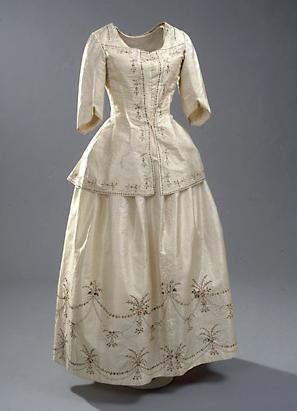
This hat is part of a new 1775-1785 ensemble we're working on that will be premiered in a Threaded Bliss post in March.  Until then, we'll offer you this teaser: a changeable silk covered hat.  New to this "issue" of Threaded Bliss is also a detailed tutorial to aid you, gentle reader, in making your own fashionable accessory.  Enjoy and let us know if you have any questions!  And don't forget to let us see what you create!


The pattern: Straw hats can be covered in a variety of ways.  One way is to trace a circular pattern directly from the hat and construct a pouch in which the hat is inserted; a smooth, flat surface on both sides of the hat, brim and crown, will be the result.  This method is detailed by our friend Laurie of Teacups in the Garden in her post about the techniques she learned in a recent class at the Colonial Williamsburg Costume Design Center.  Another method, described below, instead takes strips of fabric and fiddles with them by variously pleating, gathering, tugging, and smoothing until you achieve the look you like best!  In other words, there is no "right" or "wrong" way to do a covered hat.

Inspirations: There are many period images of covered hats available online, along with a handful of extant examples.  Here are a couple of our favorites and inspirations for our purple silk hat:

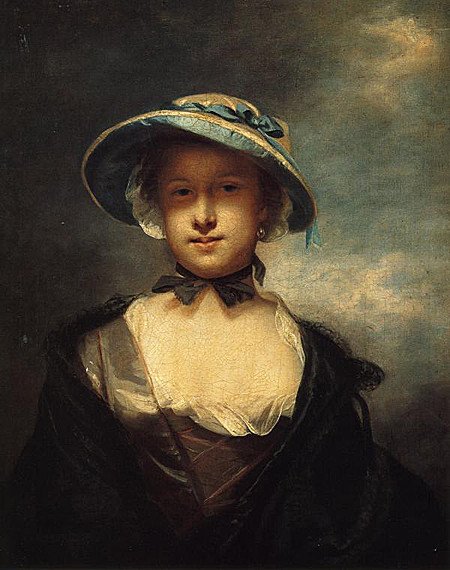
Catherine, Lady Chambers (Joshua Reynolds), 1756.

The top of the hat in the painting above (or at least the crown) appears to be pleated.  The underside is covered in a different color silk, which is also used to form the poofs and the bow that decorate the hat's crown.

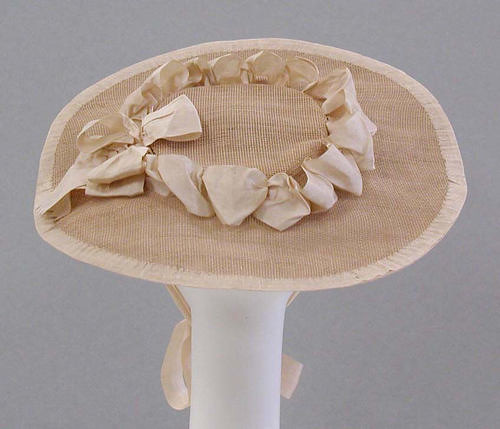
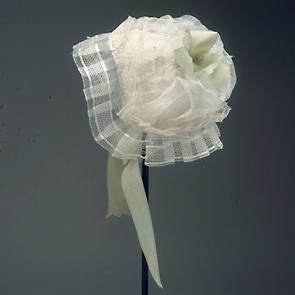
A covered silk hat from the Met Museum (acc. no. 1984.140), dating to 1760.

In this 1760 example, ribbon poofs and a big bow surround the low, wide crown of the hat.  The brim is edged with matching ribbon, which also forms the ties.  Be sure to visit this item's detail page because there's a great glimpse of the underside of this hat.

The Angelic Angler, 1780s.

This print above I love both because of the title and subject matter, and because it just shows what fun you can have with designing and decorating hats.  This later style (1780s) uses different materials to decorate around the crown and the edge of the brim, and features the poofed top fashionable during that decade.  And just for the record, I want her shoes.

Construction details: I have, at long last, remembered to take in-progress photos as I've worked on the hat, so to honor that achievement (small as it is!), I'll offer some step-by-step instructions on the "free-handed" method of hat-covering.

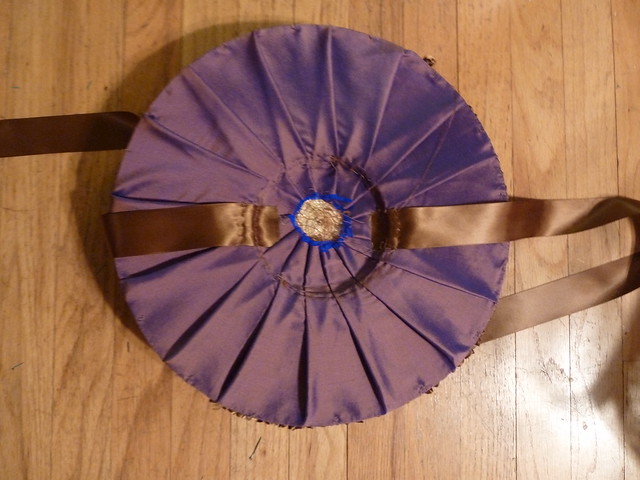
1) First, cut a square, circle, or rectangle to cover the crown of the hat.  If you want pleats, go with the rectangle; if you're going for a gathered, poofy look, the circle is best, and if you want a smoother finish, do the square and treat it as you would a fabric-covered button (in other words, yes, a round crown CAN be made to fit into a square of fabric!).  Finish the crown of your hat before you move on to the next step.

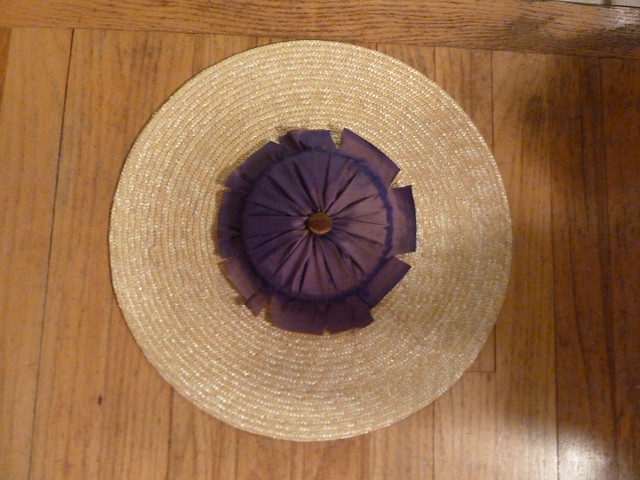
The completed crown, covered in a pleated strip of fabric
gathered at the center point.  The edges are snipped so
that they will lie flat beneath the brim covering.

2) Next, cut a rectangular strip of fabric the width of your hat brim.  Make it about a yard long to begin with, though you'll probably end up needing to add to it as you proceed with step three.  If you want only the top portion of your hat brim to be pleated or gathered, then make the width of your fabric strip as wide as the top of the brim only (plus seam allowances, of course).  If you want the underside of the brim to echo the top, you can either double the width of the strip so that it wraps fully around the edge of the brim to reach the underside of the crown, or do the top and the underside separately.  It just depends on how much fabric you have to work with, and how fiddly you're in the mood to be. Doing the top and the bottom separately is a little easier when you're doing something like evenly-spaced pleats, I think. Of course, that being said, I did this example with a single strip that covers top and bottom, but that was just a personal choice.  If you'd prefer a smooth underside, trace your hat to form a circular pattern, add seam allowances, and cut out the center hole where the crown will be.

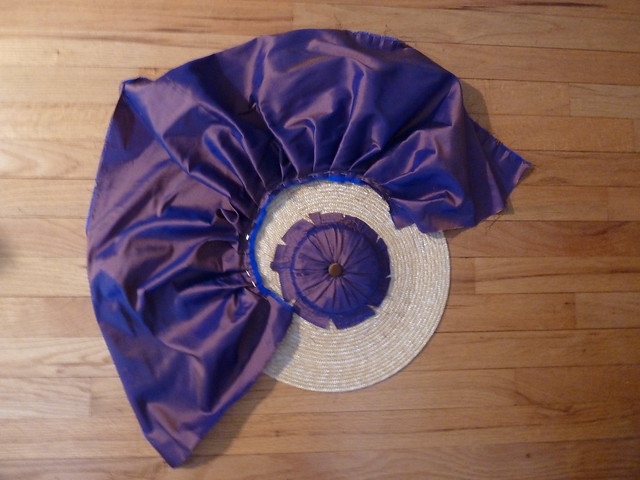
The pleated strip of fabric, ready to be attached at the base of the crown.

3) Measure the circumference of your crown and add a comfortable seam allowance to that figure.  Pleat or gather one side of your fabric strip to match that measurement.  Play with the size of your pleats or the fullness of your gathers until you achieve the look you like best.  Again, there really are no set rules with this!

4) Stitch the pleated or gathered strip around the crown.  Don't worry about finishing the edges because they will be covered by trim.

5) Arrange your fabric from crown base to edge.  You can do angled pleats like mine, straight and even pleats, pleats of different widths and angles mixed together, overlapped pleats - go with whatever your imagination suggests to you!  If you've instead gathered your fabric around the crown, figure out the best tension for the fabric as it extends out towards the brim.  Stitch down your pleats or gathers close to the edge of the brim.  If you've done some elaborate or very tiny pleating, you can stitch them down in the center of the brim as well.  Don't be shy about allowing your stitching to show; the 18th century (unlike the 20th and 21st) wasn't picky about it being visible, so your hat certainly won't be considered "sloppy" if we can see your stitches!


6) Complete the underside of your brim.  If you want the bottom to mirror the top, repeat as above.  If you've chosen to do a smooth underside, apply your circle at the brim edge and underneath the crown.  If you've done your top and bottom separately, be sure to make your stitches close to the edge of the brim, where they can be obscured by trim.

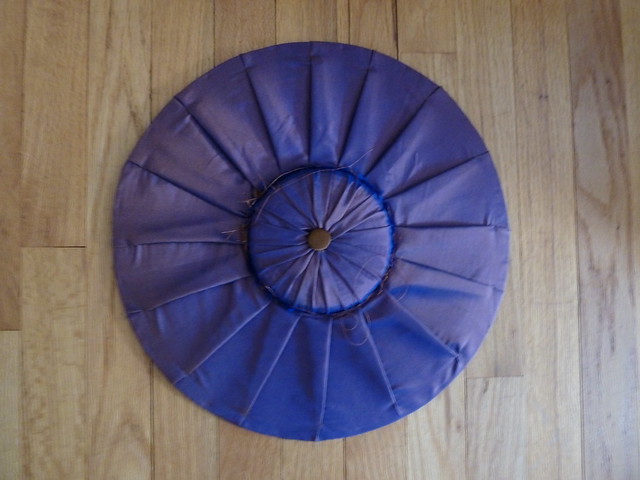
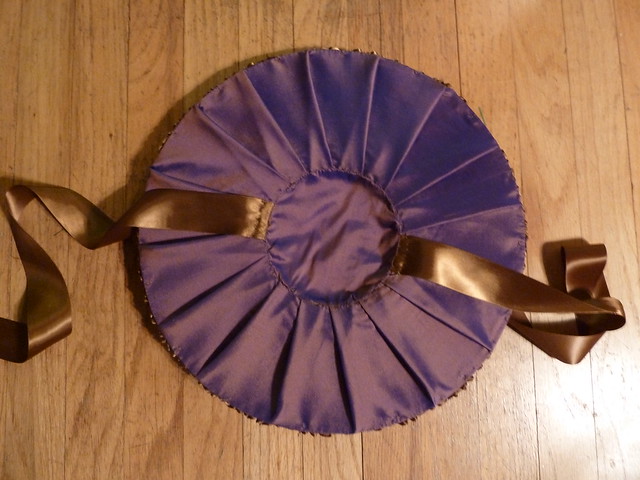
The underside of the hat with the pleats pinned in place.

7) Attach your ribbon ties to the underside of your brim.


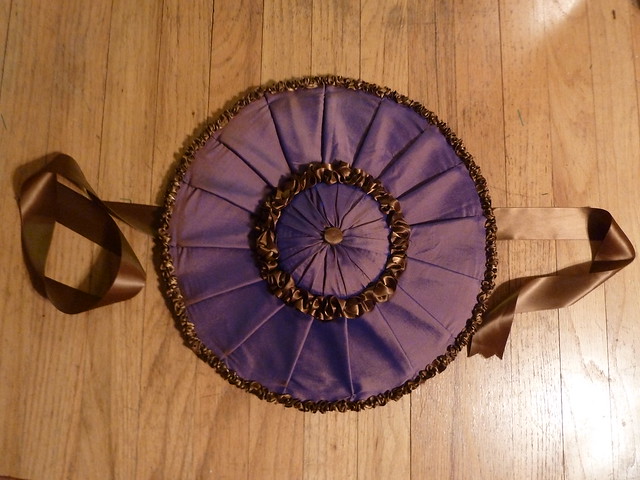
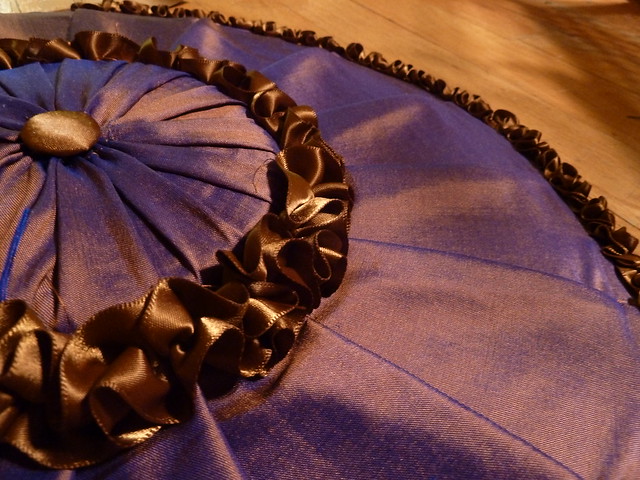
8) Decide on the trim to surround your crown and sew it down.  You can do ruched trim (as in this example), knife-pleated or box-pleated trim, bows, loops, poofs, or simply leave the ribbon smooth and wrap it around.  You can use matching or coordinating fabric, ribbon, braid, or flowers.


9) Cut a square a little larger than the size of your crown.  Fiddle with this square until it lays smoothly inside the underside of the crown and stitch it down.  You can cover the seam with ribbon if you like, or you can leave it exposed.  Once it's on your head, of course, no once will see it, so it depends on how finished you personally need your projects to feel.  I left mine plain with the stitching exposed (whatever that says about me!).

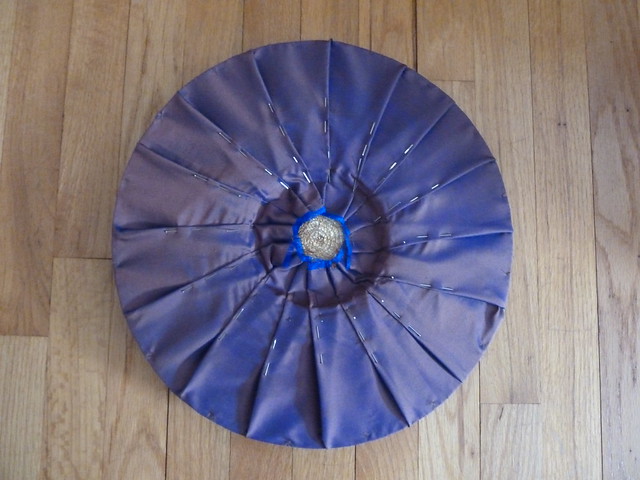
The completed underside of the hat, with the edges of the ribbons
secured beneath the crown's lining.

10) Decide on your trim for the edge of the brim.  It can mirror the style or width of trim you've used for the crown, or it can be completely different.  Once you're done with this, congratulations!  Your hat is complete!


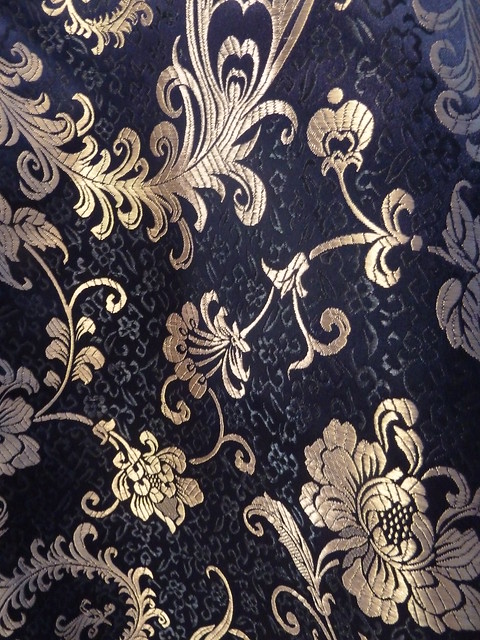
The fabric: A changeable purple and brown silk taffeta.  The ribbon trim is milk chocolate brown satin in two different widths: 1" for the ties and the ruched crown trim, and 1/2" for the ruched edge trim.  The wooden button is covered in a small square cut of ribbon.  The hat blank is from The Silly Sisters.

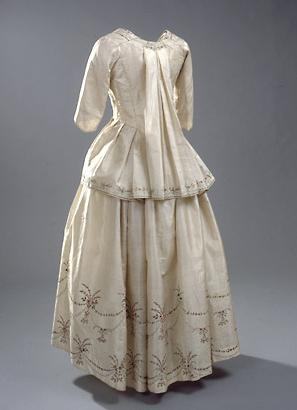
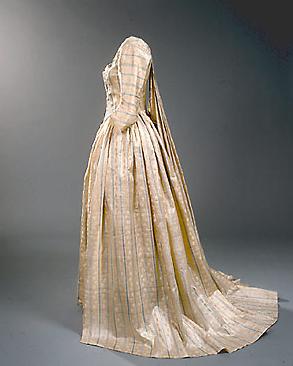
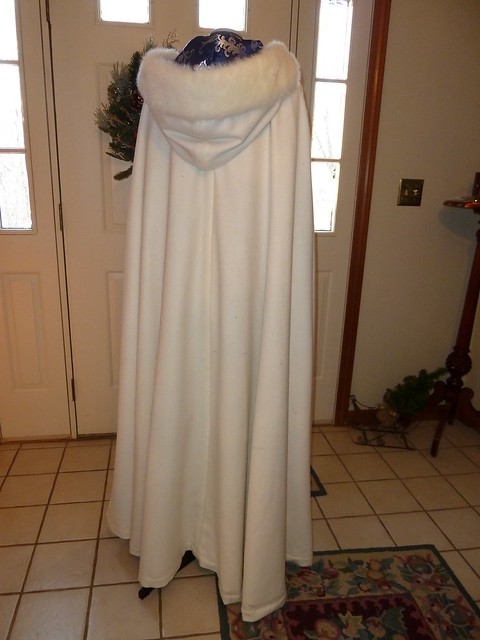
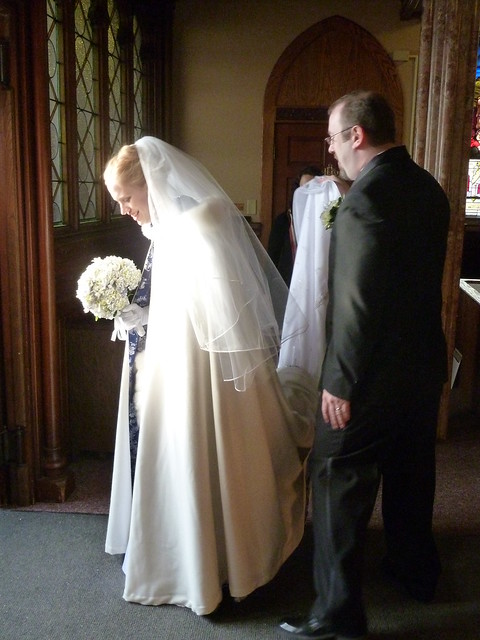
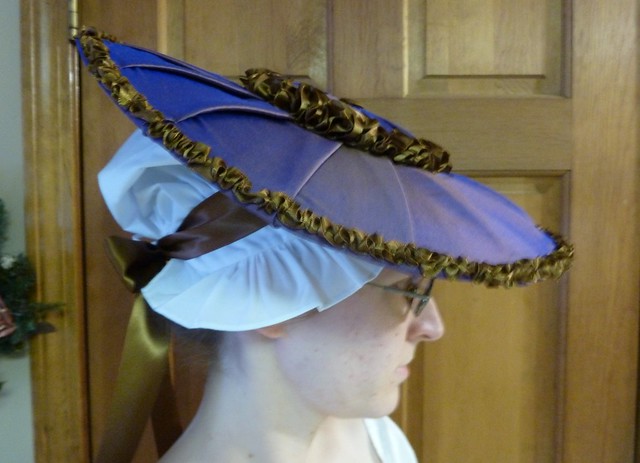
Finishing the look: In the eighteenth century, a hat (covered or not) would have (almost) always been worn over a white cap.  This particular hat was made to coordinate with a new quarter-back gown.  One thing to remember when making and wearing silk-covered hats is to be sure the "fanciness" of your hat compliments that of your gown.  A silk hat, for instance, would never be worn with a plain wool or linen gown, but rather would have been reserved for a silk or expensive cotton ensemble.


Additional in-progress photos can be found on this project's flickr set.  Stay tuned for the gown and completed ensemble coming in a couple weeks!

Thursday, February 17, 2011

Fun articles of interest

I just wanted to call your attention to a neat article in the latest edition of the Colonial Williamsburg Journal.  (For those of you who do not receive this publication, there is a wonderful abridged version available online, along with a nice archive of articles past.)  "Reflections on Reenacting" provides a fun glimpse into this “hobby” with personal anecdotes by the author, D.A. Saguto (CW’s master boot and shoemaker).  Mr. Saguto touches on the difference between reenactors and interpreters, as well as the practice that has become known as “living history.”  If you are completely new to the concepts behind these practices, this is a good overview.  And for those of us who are familiar with these ideas or have experience with them ourselves, you will find yourself smiling and nodding as you read.

Also in this edition is another insightful article about John Trumbull and his famous painting, The Declaration of Independence.  (Remember our post about visiting Trumbull homes in Lebanon?)  Be sure to click on the Online Extra called “Explore The Declaration of Independence by John Trumbull.”  You can roll your mouse over each signer’s face to reveal their names, and learn some fun facts as well.

If this kind of random stuff gets you as excited as it does me, be sure to investigate this publication's archives and upcoming issues!

Tuesday, February 15, 2011

Treasures and Curiosities from...

The National Museum of Denmark

"Tidens Tøj," loosely translated (by Google, I don't speak Danish!) as "Time's Clothes," is the virtual companion to "Body and Disguise," an exhibition (semi-)recently staged by the National Museum of Denmark, which featured items of clothing from the 18th through the 20th centuries.  One of the highlights of this particular virtual museum collection is that it offers a number of scaled patterns on items' detail pages.  If only a greater number of museums would start to do this and make it a trend in virtual exhibits and online acquisitions catalogues!  We'll just keep hoping (and hinting!)!

All of the information I've gathered from the website was gleaned through a Google translation of the original Danish text, so if I've misinterpreted anything, pray forgive my errors.  If your knowledge exceeds mine in this area, please do let me know of any corrections so that I may make them swiftly.  Thank you!

The following images are borrowed from, and linked directly back to, the website of the "Tidens Tøj" exhibit and originate entirely from the digital database of the National Museum of Denmark. They remain the full and copyrighted property of the aforementioned museum. All images are used for private educational purposes only, without any monetary gain whatsoever, and no copyright infringement is intended.

Our National Museum of Denmark Top Ten:
Number One: A silk hooded "caraco" jacket in silk, dating to approximately 1775 (acquisition number W.25.a (petticoat) and W.25.b (jacket)).  I can't make out much more than that from the Google translation, unfortunately.  The museum identifies this as undress, an informal, "morning" outfit of the sort one would wear at home before dressing for the day.


This is a wonderful piece.  I love the pleating at the back, and the way it is fitted using the waistband piece.  I also love the drape of that hood.  I wonder, though - is it what we would call a brunswick, strictly speaking?  That same question applies to the piece below as well.  Could anyone offer some insight on that?

Number Two: A morning suit of quilted silk, 1778 (acquisition number W.26.a).  The pet-en-l'air/brunswick smorgasbord is secured in front with ties.  It appears from the photograph that the skirt part is not merely a petticoat (as above), but is actually a gown of some sort.  If only we could see it in its entirety!  And don't you just love this color?  So delightfully springy!


The provenance for this piece is neat.  It was the "bridal morning suit" owned by the wife of a cleric, and, according to the museum, was most likely worn by her during those first few days of honeymooning at home after her wedding.

Number Three: A sacque-back gown and matching petticoat of silk, 1778 (acquisition number W.8.g).  The silk appears to be painted, but I can't confirm that with the icky Google translation.


The gown's trim is padded and edged with lace, and the interior of the bodice is lined with a red canvas (linen or cotton, I can't tell).

The interior of the gown, showing the back lacing that adjusts
the gown's size beneath the loose back pleats.  For further details
on how this works, see this earlier Threaded Bliss post.

Be sure to check out the museum's detail page for this one because they offer a fantastic discussion of one of the quandaries that so often faces curators of costumes: how precisely was a garment worn, and should possible missing pieces be reproduced by conjecture, or simply left out so that the original may speak for itself?  In the past, the website explains, this gown was displayed with a reproduction stomacher and the back lacing tightly closed to expand the chest width.  For this exhibition, however, the curators made the choice to leave a stomacher out because it was not original to the gown; loosening the laces, they displayed the ensemble as if the center front closed edge-to-edge.  This raises some crucial questions about museum re-presentations or interpretations of objects, and in anticpation of the upcoming CW conference, "A Reconstructed Visitable Past," I invite you, gentle reader, to offer your thoughts on this issue.  What is at stake in making these types of decisions?  What would you do, and why?

Number Four: A jacket ("bodice") of greyish-beige silk brocade, dating to the 1770s (acquisition number 813/1951).  This jacket was made for a young girl about 7 years old; because long gowns were expensive and a heavy encumberance for a young lady, the shorter skirts of a jacket like this were an acceptable concession, as the structured style still helped maintain the fashionable body shape of the period.


The jacket spiral-laces up the front with eyelets, which are concealed beneath the robings.  Presumably there was once a matching stomacher, which is now missing.  There is a detail photo on the item's page, but the link doesn't seem to be working properly.  The back of the jacket appears to be shaped with en fourreau-like pleats that are then released into the skirts.  The remainder of the skirts' fullness is achieved by gathering (or pleating, it's so tough to see!) the fabric along the shaped waistline.


Number Five: A (probably) Spitalfields silk satin robe a la francaise (acquisition number W.8.j).  The gown's design has been dated to 1786, while the woven larger pattern on the silk suggests the fabric dates to the 1740s.


Number Six: A young child's dress of narrow pink and white striped taffeta, 1780-1785 (acquisition number W.1138).  The gown actually closes in back with ties.  The false stomacher front is created by arranging strips of ruched silk in the traditional V shape; that V shape is echoed in the dip at the center back waistline.  Box pleats decorate the hem of the skirts.  I just love this piece.  I think it's my favorite of this grouping.


Number Seven: A silk gauze cap decorated with a green silk taffeta bow and ribbons, 1780-1785 (acquisition number W.1138).  This delicate cap was made to be worn with the child's gown above.


I love the look of silk gauze caps.  The milliner's shop at Colonial Williamsburg frequently displays adult-sized examples of their own design, one of which can be seen here on their facebook page.

Number Eight: A silk pet-en-l'air (the museum lists this as a caraco, but I'm thinking something is being lost in translation) and matching petticoat, 1780s (acquisition number W.9).  The detail page indicates that the fabric was imported from China, but it doesn't say whether it is embroidered or painted.  It's very difficult to tell from the small photos, and the one close-up link doesn't work.  Boo!  :-(


This garment closes with a false-stomacher edge-to-edge "vest" or "waistcoat" front.  The very narrow pleats in the back, along with the past-elbow-length sleeves and the shorter skirt, date this pet-en-l'air to the 1780s. 


Be extremely excited!  A scaled .pdf pattern for this caraco and the matching petticoat is provided on the museum's detail page for this listing.  I only wish they also offered a more detailed sketch of the embroidered (or painted) design, becasuse I'd love to reproduce that, too!  A word of warning about the .pdf - there is no indication about the scale used in the drawing.  I assume it is centimeters, but I haven't double-checked that so make a muslin first (as always!) if you use it for a full-scale reproduction.

Number Nine: A quarter-back open robe of printed cotton with a matching petticoat, dating to the 1780s (acquisition number W.18).  The front of the bodice is boned.


A detail of the printed cotton fabric.

The National Museum of Denmark took a pattern from this gown as well, and has made it available in a scaled .pdf on this item's detail page.

Number Ten: A striped silk piemontaise, dated to approximately 1780-1790 (acquisition number 621.a-c).  The piemontaise was like a robe a la francaise, except that the pleats were left to hang free from the shoulders and were not incorporated into the back bodice or the skirts of the gown; the bodice of the gown, in other words, is cut much like a quarter-back gown.


Occasionally, the pleats of a piemontaise are tacked down at the waistline, but in this case they appear not to be.  Gowns like this were in style for a very brief time in the 1780s, and as a result are quite hard to come by.  See this fantastic article on a similar piemontaise from La Couturiere Parisienne for a detailed exploration of the quirks of this often-forgotten style.

There is a pattern taken from this gown as well, which helps to illuminate the way the piemontaise style worked.  Visit the museum's detail page for a .pdf!

Printed Resources Featuring Items from the 18th century part of the National Museum of Denmark:
The detail pages for each of these items list the published works in which the garment has been featured.  If you can read Danish, you're in luck here!  If not, you'll just have to sit with me in confusion and regret at potential costuming resources lost in translation.  If anyone with some knowledge of Danish can locate any of these resources, do let me know so I can update this post and share them!

Thursday, February 10, 2011

Conversations at Poplar Forest - And Online!

Each year, Poplar Forest hosts a performance entitled Conversations with Jefferson.  The performances feature the inestimable Bill Barker as Mr. Jefferson in discourse with other talented interpreters portraying historical figures from his lifetime.  In the past, he has entertained guests such as Aaron Burr, Dolley Madison, and even Napoleon Bonaparte.  This year's Conversations is scheduled for May 7, 2011 when Mr. Jefferson will host King George III in the person of another exciting interpreter, John Hamant.  Visit the Poplar Forest website for more information about this program and to purchase tickets.

Coinciding with this event each year is another performance geared towards a younger audience.  Shaping the World: Conversations on Democracy features the same Mr. Jefferson and a guest, but occurs in more of an interview format with elementary and middle school students as the audience.  The students are engaged by being encouraged to ask the questions themselves.  This program is broadcast by Blue Ridge PBS and other local PBS stations, and is also streamed by the Virginia Department of Education.  Poplar Forest also provides lesson plans and other materials to compliment the program.  What an excellent and interactive resource for education this is!  And now, for those of us who are no longer in school, but still consider ourselves students of history, these programs are available as free downloads via iTunesU.

Mr. Jefferson (Bill Barker) and Patrick Henry (Richard Schumann)
answer questions during a 2010 Shaping the World: Conversations
on Democracy program.

The property at Poplar Forest was inherited by Thomas Jefferson upon the death of his wife's father, John Wayles.  Poplar Forest became Jefferson's retreat and over time he designed and built the octagonal home.  His grandson, Francis Eppes (the only surviving child of his daughter Maria), began living there in 1823, though Jefferson still oversaw improvements on the property.  Having received the property through a bequest in Jefferson's will, Eppes sold it in 1828, just two years after Jefferson's death.  It remained in private hands until 1983 when a nonprofit corporation was formed to purchase and begin preserving and restoring the home and land on which it stands.  As a National Historic Landmark, Poplar Forest continues to provide visitors with a unique look at Jefferson's retreat, as well as the opportunity to see an ongoing archaeological and restoration project.

The events above are only a glimpse of what Poplar Forest has to offer.  I hope that those of you who live nearby or plan visits to the area will stop by to appreciate what has been accomplished and continues to be explored at Poplar Forest.  Unfortunately, due to distance and my limited vacation time, I have yet to visit Poplar Forest myself.  It has been on my dream destination list for quite some time, and I hope to have the chance to visit very soon.  So I am very grateful for these new online Conversations and other updates via the Poplar Forest facebook page, which allow me to keep up with what is going on at Jefferson's retreat.

Monday, February 7, 2011

Threaded Bliss

A Winter Wedding Cloak

I debated whether or not to include this project under the "Threaded Bliss" category since it's not a historical garment, but in the end I decided it's historically-inspired, so it deserves a place here anyway.  :-)

This cloak was made as a "commission"/wedding present for a good friend's winter wedding.  She selected the fabric to coordinate with her wedding colors and provided the pattern, and I went to work!  It took a LOT longer than I thought it would, but it came out quite pretty and looked gorgeous with her wedding day ensemble.  I hope it achieved the vision she had of it in her head for so long!


The pattern: Butterick 3084, an out-of-print cloak and cape pattern.  The pattern was extraordinarily easy, though it required some serious reshaping in the shoulders.  Whoever designed it must have had quarter-back shoulders because this was definitely excessive!  It isn't a historically accurate pattern by any means, but perfect for a luxurious and drapey fantasy look, which is what my friend was looking for.  The oversized hood has a fabulous drape as it rests on the shoulders, either worn up or down.

Construction Details: The pattern called for a bag-lined cloak, but we opted for three layers instead, both to give it a more couture and classy finish and because of the fabric choices.  The cloak is lined in a stunning royal blue and silver brocade, which showed through the creamy white outer wool layer and thus necessitated an interlining.  I therefore decided to machine-stitch the long seams of the outer layer, the interlining layer, and the brocade lining layer and attach the hoods to each by machine, so that I essentially had three cloaks, one in each fabric.  Then I attached the brocade and the interlining cloaks (wrong sides together) along the outer edges, leaving the bottom hem open so that I could turn it right-side out.  Then I hand-stitched the two layers together down the long body seams to ensure that they would drape correctly and not shift around too much.  Next, I stitched this lining to the wool outer layer along the edges using the 18th century technique of turning under the wool edges and finishing them and attaching the lining with the single step of utilizing the "le point a rabattre sous la main" stitch.  The long body seams of the wool layer were then sewn down to the seams of the lining, as in the interlining/lining piece.  Then I finished the hem of each of the three layers individually to ensure that there was no bunching or bubbling when the very full cloak hung off the shoulders, and to make sure the hems all hung evenly.


The final touch was some beautiful (and I mean beautiful) fur edging applied to the hood.  My friend's mother had bought her a fur muff and decided that in order to ensure the muff's fur perfectly matched the hood's fur, the best option would be to buy a matching stole and cut it to fit the hood.  I won't lie - it was terrifying cutting into that stole!  I cut a 3" strip from it, finished off the edges by turning them under, and then applied it to the hood edge by hand with tiny whipstitches that wouldn't be visible.

The fur stole, prior to creative mutilation by my scissors.

The re-incarnation of the fur stole as edging on the hood.

The front closure is a black metal frog clasp that I sewed to the inside of the cloak so that it wouldn't be visible.

The Fabric: The outer layer of the cloak is a very yummy creamy-white wool that my friend drove all the way to Vermont to find.  She couldn't find any wool locally that was high-quality enough for the look she wanted, so she visited the Dorr Mill Store and found a stunning piece of wool that is so buttery soft and was a dream to work with.  If you're on the look out for high-quality wool at very reasonable prices, take a look at their website because I highly recommend it!

The lining is a royal blue and silver brocade with a very 1750s-esque pattern.  It looked gorgeous with her sapphire and diamond jewelry!  It's a little tough to see in the pictures of the full cloak, so here's a close-up.  Isn't it pretty?


Finishing the Look:  Well, I'll just let that speak for itself!


Congratulations to my very dear friend and her new husband!  :-)