Monday, September 23, 2013

18th Century Turnshoe Workshop (Part Three)

As I mentioned in the first post in this series about our Crispin adventures, our shoemaking instructor recently held a workshop reunion that three of us students were able to attend back in July.  During a previous reunion last year, which I had to miss, the other two had made progress far ahead of me, which meant we were each at a completely different part of the process.  This was actually a good thing because we ended up comparing notes and sharing reminders about individual steps as we worked.

Emily (of Emily's Vintage Visions) was one of the attendees at the workshop reunion, and having also been at last year's meeting, she's now getting very close to being finished with her shoes!  During the reunion, she worked on stitching in her whittaw heel cover on one of her shoes and oh-so-painstakingly shaping her wooden heels to the proper size and curve to fit her individual foot.

P1070384
Emily's shoe with the heel cover newly attached...

P1070385
...and the wooden heel being glued into place.

R, who is making a pair of gentleman's shoes for himself, also made significant progress during the previous meeting, and by our recent July reunion was also nearing the end of the process.  Over our two-day meeting, he worked on stitching in the rand of his shoes (gentleman's shoes - like earlier women's shoes - were randed, not turned, like the ones Emily and I are working on).

P1070393
R stitching in the rand on his gentleman's shoe.

Without expert eyes to oversee my work, I hadn't done a thing to my shoes since the original workshop back in 2011.  This was the state of them: my last and instep were completed and one of the uppers was almost done.  The heels and the sole leather are still in their original, untouched states.

shoes after the workshop
Completed last with instep and uppers in pieces before the July workshop reunion!

Being behind actually ended up working to my advantage in the end!  Having encountered a couple of minor fitting issues at the last reunion with the other students, our instructor decided it might be a good idea for me to take the time to make a "trial fitter" test shoe to double-check the fit of my pattern before I went ahead and lasted my calamanco uppers.  The trial fitter was assembled similarly to the real shoe, but with much coarser stitching and only very thin scrap leather for the test sole.  It turned out that my pattern fit perfectly, so no changes will be necessary with the final shoe!  Huzzah!  This means I can now start lasting with confidence!

P1070382
Lasting my trial fitter, sewing the upper to the sole.

P1070400
The trial shoe.

P1070403

After making and testing out my trial fitter, I then spent the remainder of our reunion finishing up my uppers, which are black calamanco lined in a soft but strong whittaw.  The edges are bound in black silk grosgrain ribbon.

I have tentative plans to meet up with the instructor again some time in the next month or two, so hopefully these shoes will be well on their way to making even more progress soon!  I can't wait until they're done - I have so many other pairs in my mind's eye that I'm longing to make!

Thursday, September 19, 2013

Threaded Bliss

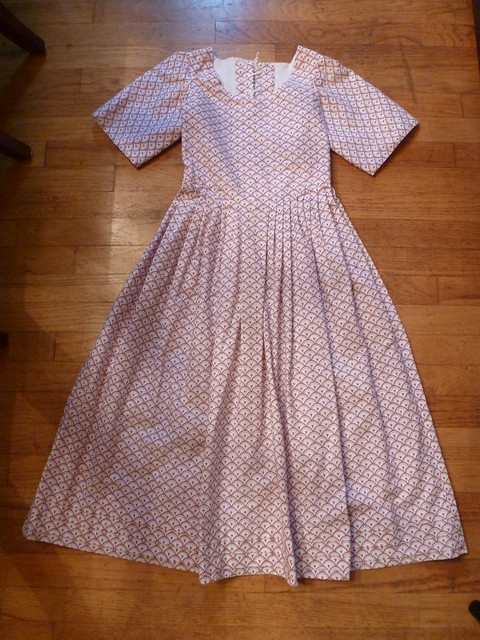
A Cotton Print Gown for a Young Lady,
1750-1790

reproduction shell print cotton girl's gown, 1750-1790

It is often the young girls who are the ones most fascinated by seeing the clothing we ladies wear to reenactments, and the girls who are the most excited when you offer them the chance to handle a gown, test out a fan, or try on a hat.  But the question always arises, "Would little girls like me get a dress like this, too?"  I have a small collection of images of 18th-century children that I bring with me to our non-battle public reenacting events, demonstrations, and "shows," but I always wanted to make a representative girl's gown to be able to give these inquisitive young ladies a real glimpse at what their counterparts wore centuries ago.

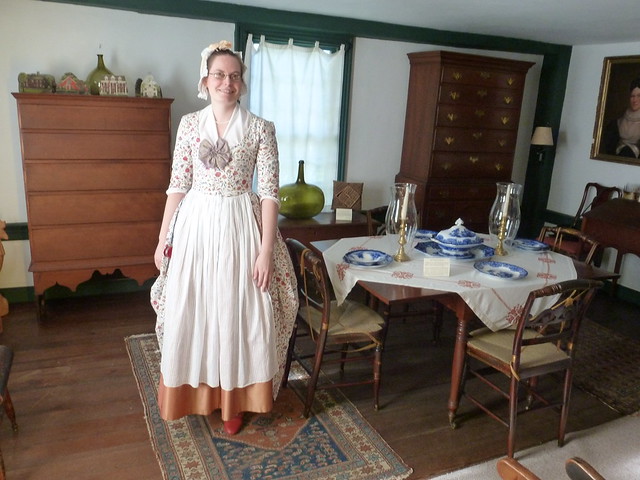
With a special local historical society event this past weekend, I decided it was the perfect time to finally get around to making something suitable, and I'm so glad I did!  The reaction it got from all the young visitors was priceless - added to which it also offered the perfect photo opportunity!  It was so, so precious watching these little ones fall in love with historical fashion.  :-)

reproduction shell print cotton girl's gown, 1750-1790

The pattern: Not having a child of my own to draft a pattern on, and having examined only a handful of extant children's gowns myself, I decided that going with a pattern for this project would be the best way to assure I achieved the proper shape and proportions.  There are surprisingly few options out there when it comes to gowns appropriate to girls and pre-teen young ladies, but based on the original pieces I've examined, and on images I've looked through online, I opted for the Mill Farm pattern, which gives an accurate and representative shape appropriate to girl's gowns worn between about 1750 and 1790.  I made some changes to the pattern based on my own research, which I'll detail below, but these were more or less minor.

Inspiration: I wanted to make an everyday gown for the child of a lower-middling family, which would represent the majority of CT families (mostly farmers) during the Rev War period.  My primary inspiration for the fabric choice was a "blue and white sheled" cotton/linen textile currently on display in the "Threads of Feeling" exhibit.  It's included in the Threads of Feeling book as figure 33, on page 41.  The child admitted with this token in 1759 was a girl, and I was delighted to find a brand new fabric that had been recently released that fit the bill quite satisfactorily.  More specifics on the fabric are below.

Extant children's clothing is, predictably, rare because it would typically have been worn by multiple siblings until it fell apart.  I did, however, have two main inspiration originals for this project.  One was a brown wool gown dated to the 1740s in the collection of the Met Museum.  The Costume Design Center at Colonial Williamsburg did a reproduction of this gown (right down to all of the piecing details) and had it on display during the "Reconstructed Visitable Past" conference several years ago, so I had a chance to examine it closely there.

Child's gown, Met Musem of Art acc. no. 1990.24.
Image linked from the Met Museum of Art online collections database.

Back of child's gown, Met Musem of Art acc. no. 1990.24.
Image linked from the Met Museum of Art online collections database.

The other was a cotton print gown in the Philadelphia Museum of Art dated to 1780.  This gown has some curious details, including the mock laced-in stomacher and the flaps at the sides that (one suspects?) might cover the pocket openings, or simply reflect the peplums of jackets that were increasingly popular in that decade.  There is no back view available, so you can't tell how far these pieces extend around the back, nor how the gown is fastened closed.

Child's dress, Philadelphia Museum acc. no. 1943.23.1.
Image linked from the Philadelphia Musem of Art's online collections database.

Construction details: The 
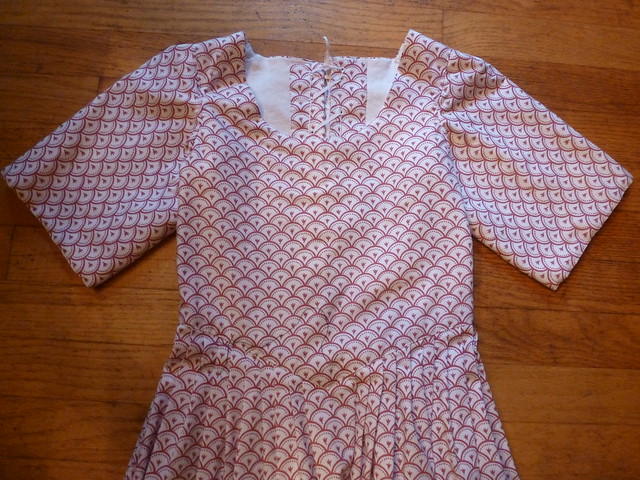
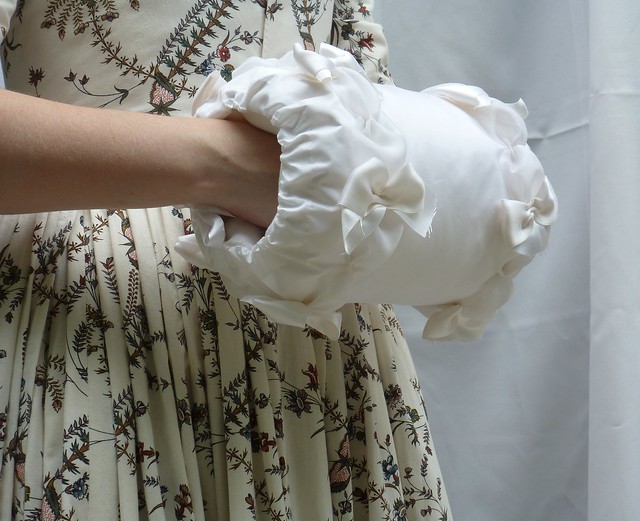
Mill Farm pattern was clearly written with an experienced sewer in mind, so the directions were correspondingly limited when it came to specifying stitches and similar details.  This basically leaves construction methods up to the sewer, so I opted to put my gown together using the documented construction techniques I use on all of our adult gowns.  First, I assembled the sleeves as usual, opting not to include tucks in them, following the Philadelphia Museum inspiration source, though you do sometimes see two or three sleeve tucks in period images of cotton or linen gowns.

The bodice lining was done in the same way as a typical gown lining, turning the edges of outer fabric and lining in on each other to finish the neckline.  The sleeves were also inserted in the "usual" way, which got a little complicated because I didn't have a child's shoulder to fit them on, so I just fiddled with the sleeve cap pleats until they looked good to my eye and then double-checked to see how close my fit was to the pattern's.  I then top-stitched the shoulder straps down to cover the top of the sleeve, in the same way as you would for a woman's gown.

reproduction shell print cotton girl's gown, 1750-1790

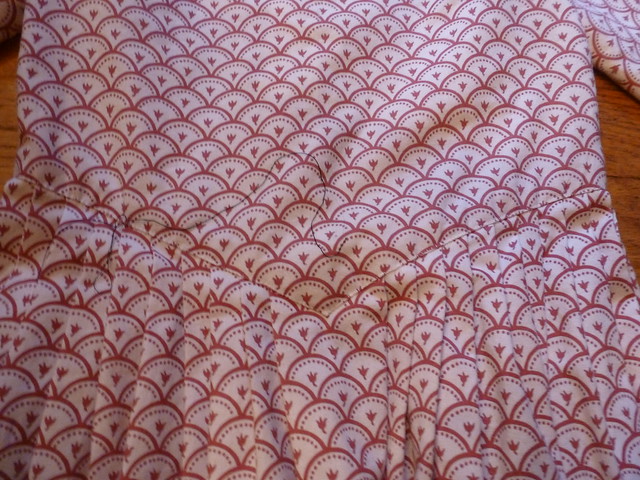
The skirt of the gown has three growth tucks along the bottom.  The couple of originals I've looked at had very deep hems instead of the growth pleats, but you do see a lot of tucks in children's gowns in portraits and I prefer their look to the deep hem.  It's also much easier to let out a tuck to lengthen the gown than it is to unpick the hem, let it down, refold it, and then hem it all over again.

reproduction shell print cotton girl's gown, 1750-1790
Three growth tucks are at the bottom of the skirt.

The pattern did not include pocket slits, but I added some because the kids who visit our events love learning about tie-on pockets and speculating about what they might have kept in them if they lived "back then."  Because I added the slits, I opted to pleat the skirt to the bodice instead of gathering it, as the pattern calls for.  Both methods are documented, but I preferred the pleats to help accentuate the pocket slits.  They're angled in the same directions as they are in the standard 18th century petticoat.

reproduction shell print cotton girl's gown, 1750-1790

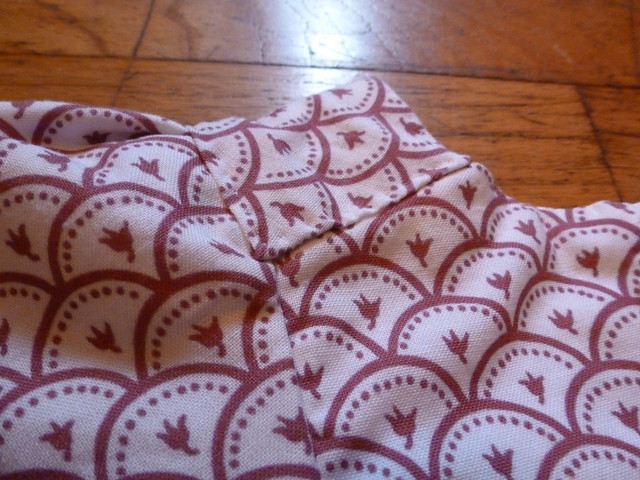
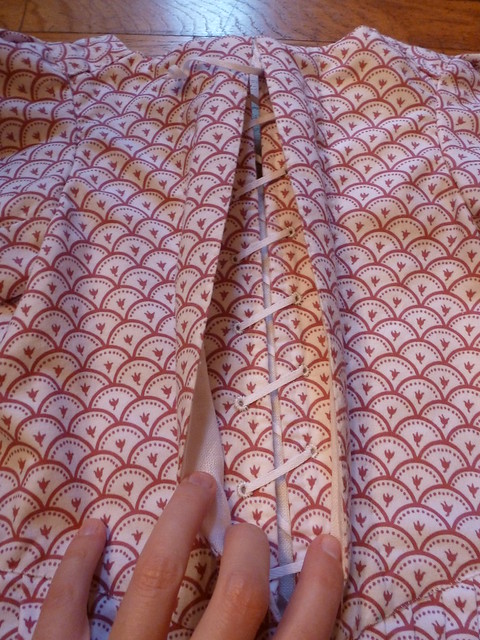
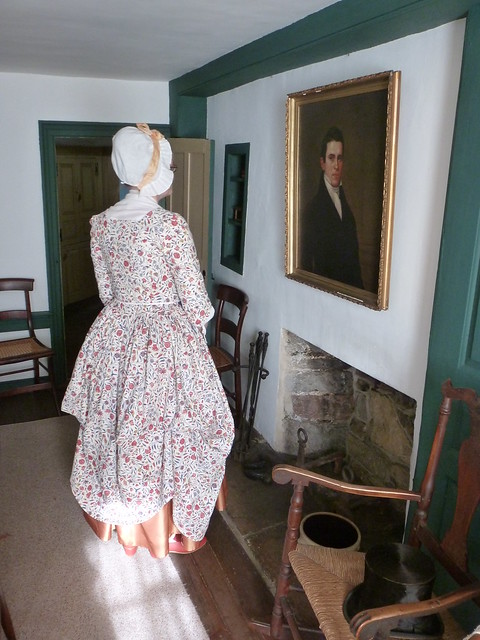
The back of the gown laces closed with two hidden eyelet panels sewn into the back of the gown to allow for greater adjustability, a feature I copied from the Met original.  The pattern includes criss-crossed lacing, but I changed it to spiral lacing to reflect the lacing pattern on that same extant Met piece.  I also liked the idea of the spiral lacing mimicking the conventional lacing style of stays.

reproduction shell print cotton girl's gown, 1750-1790
The gown laces closed in the back using two concealed lacing
strips supported by two pieces of boning.

reproduction shell print cotton girl's gown, 1750-1790
Spiral lacing up the back.

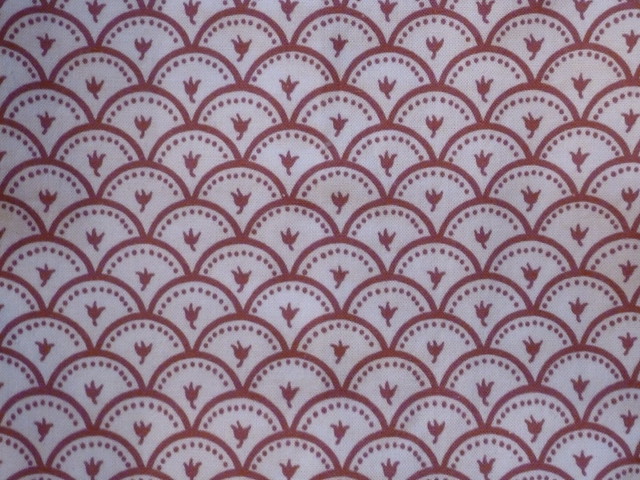
The fabric: As I mentioned above, the inspiration fabric was a "blue and white sheled" cotton/linen textile token from "Threads of Feeling."  While monochromatic arched "shell" prints and motifs were very popular throughout the second half of the century, particularly amongst the lower classes, there are few options available now in terms of comparable modern fabric.  Duran Textiles offers a document reproduction of an original shell print that lines a 1760-1780 banyan at Winterthur, but this was a tad out of my price range for this project.  Instead, I opted for a new print recently released by Wm Booth, Draper that was inspired by multiple shell prints.  It's a very nice quality and a lovely weight and looks adorable made up into the gown.

reproduction shell print cotton girl's gown, 1750-1790

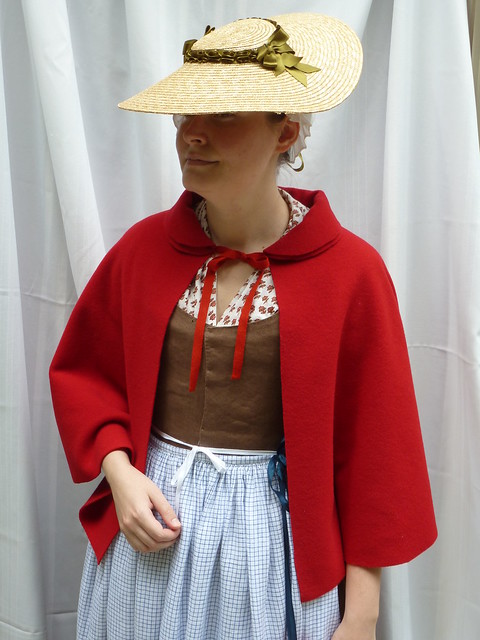
Finishing the look: A young lady wearing this gown would have worn it over a shift and perhaps over stays, though as the century worn on, younger girls tended to wear stays much less frequently than they had in the past until they reached puberty.

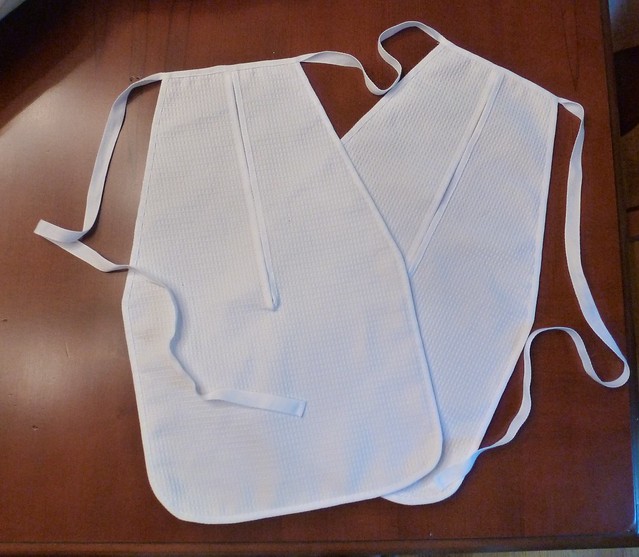
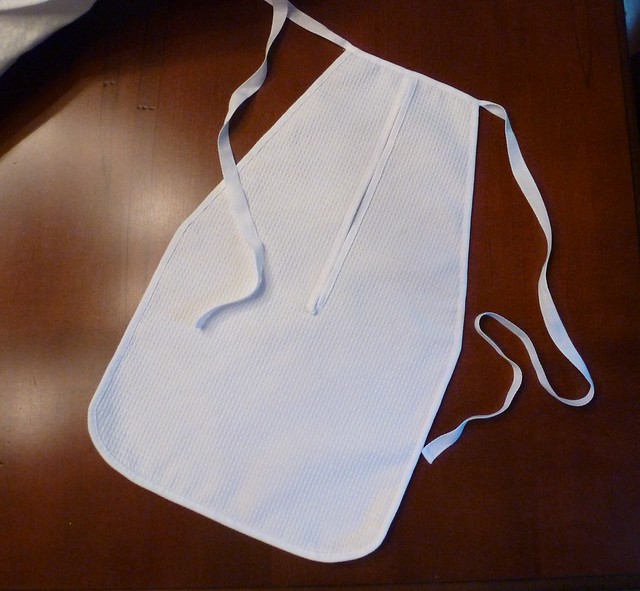
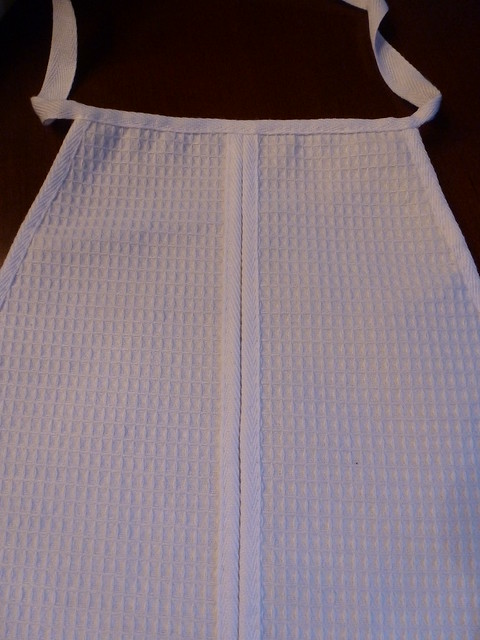
Inspired by one of my favorite period paintings of a child, Chardin's Une petite fille jouant au volant (1741), I'm planning to complete this display item by making a white linen pinner apron to pair with the gown, as well as a smaller set of child's pockets and a child's cap.

Sunday, September 15, 2013

Threaded Bliss

Dutch Cotton Chintz Gown,
circa 1780

Dutch chintz gown, 1780

The pattern: This is from my usual bodice that Ashley draped on me at the gown workshop.  Because I wanted this gown to reflect a 1780 date, which is consistent with the textile I used, however, I raised the waist ever so slightly so that it falls just above the natural waistline.  I also widened and lowered the neckline just a bit.  The sleeves are also a teensy bit tighter than I usually do them, as increasingly became the fashion as the 1770s turned to the 1780s.

Dutch chintz gown with silk taffeta petticoat, 1775-1785

Construction details: Because this is yet another 1770-1785 fitted-back gown (let's face it, we're both living entirely in the Rev War period these days...!), the construction details are identical to those of every other gown we've made from the same period.  The last outline we gave for gown construction was in the pink worsted gown post, so check that one out if you're looking for more details.  Don't worry - we've got some new and exciting - and different! - projects coming up soon!

Dutch chintz gown with silk taffeta petticoat, 1775-1785

Dutch chintz gown with silk taffeta petticoat, 1775-1785

The fabric: A stunning Dutch chintz from Den Haan and Wagenmakers.  It was pricey, but the price reflects the quality and it's just gorgeous stuff.  We've both used their fabrics before for jackets, but that only necessitated buying a single yard at a time.  I held off indulging in a gown length for years...couldn't justify spending that much money at once on a single gown...and then a few months ago, I finally broke down and splurged and I'm so glad I did.  I absolutely love this print and its possibilities!  The silk taffetas used in the petticoats, the breastknot, and on the cap are all from Burnley and Trowbridge.

Dutch chintz gown, 1780

Finishing the look: The best part about this fabric is the sheer number of petticoat possibilities, since there are so many different colors in the print.  What's so much fun is that the fabric looks completely different with each change of petticoat, so it's like having half a dozen potential outfits in one!

The first time I wore this gown was the Friday of UTR in Williamsburg.  Since our regiment didn't attend in an official capacity this year, I took the opportunity to wear something more satisfyingly posh and pretty than my usual dirty camp gowns.  I paired the gown with a yellow silk taffeta petticoat and my new (favorite!) hat trimmed and lined with blue/green changeable silk.  The yellow of the petticoat really pulled out the yellows and blues of the gown.

Dutch chintz gown with silk taffeta petticoat, 1775-1785

Today, for a local historical society event, I chose an "aurora" silk taffeta petticoat (pink/yellow changeable).  This completely changed the way the fabric appeared to the eye, highlighting the pinks and purples in the print instead.  To aid that even further, I added a purple/yellow changeable silk taffeta breastknot and then capped (haahaa, sorry, couldn't help myself!) it all off with a yellow silk bow on my cap.  A sheer striped white cotton gauze apron, my B&T red shoes, and a pearl necklace completed the "best" middling look I was aiming for, in keeping with our historic house location.  I just wish I'd been able to get better pictures than this - these really don't do justice to the brightness of the colors and the way they all played off of each other.  But I really love this outfit!

Dutch chintz gown, 1780
 
I think the next time I wear this gown, I'm going to try it with my blue/ivory changeable silk petticoat.  I also have more of the purple/yellow changeable waiting to be made into a gown with a matching petticoat, so that petticoat would also be a nice complement to this gown as well.  One can never have too many petticoats...;-)

A couple additional photos can be found in this project's flickr set.  Clicking on any of the images here will bring you to their larger flickr format.

Dutch chintz gown with silk taffeta petticoat, 1775-1785

Monday, September 2, 2013

Shop Online at "A Fashionable Frolick" on Etsy!

Are you wondering what you've been missing if you haven't yet joined us on Facebook?

Well...this weekend, you've missed the special announcement of the opening of the Fashionable Frolick Shop on Etsy!

blue/brown changeable silk taffeta muff

After months of preparation, hard work, and diligent sewing, we are pleased to announce the grand opening of our newest venture: an Etsy shop featuring 18th-century accessories and clothing!  We know that there are a number of other places you can find period clothing, but there's always room for one more source, and we'd love to share some of our own designs and creations with you.  Check out the "Shop @ FF" tab in the top menu to see more of our offerings, or visit us on Etsy to see the live listings.

P1070690

We will work hard in our Shop to provide you with the highest quality historical clothing available anywhere today. Each item we produce will be meticulously researched to ensure 100% accuracy in design, materials, and construction techniques. As a business that caters to reenactors, discerning historical costume enthusiasts, historic sites, and museums, we pledge that every stitch will be hand sewn in the period manner with absolutely no modern shortcuts to give you a piece of historical fashion you can be proud to wear or display.

red wool broadcloth short cloak

Over the next several weeks, we'll be adding new items to the Shop, including additional hats and muffs and a number of other essential 18th-century accessories and articles of clothing.  We also have a couple of non-wearable but still historical-fashion-inspired surprises up our sleeves!  Two hours before a new item premieres in the Shop, it will be exclusively featured on our Facebook page to give our friends there a special sneak preview and heads-up.  So if you haven't yet joined us for some Frolicks on Facebook, now is the time so you don't miss any more of the excitement!

winter white silk muff

If there's something specific you'd be interested in seeing in the Shop, do let us know!  We're happy to accept custom orders for variations on any of the items currently featured, and we're always willing to entertain new product ideas as well!  Happy shopping!

P1070698
 

Sunday, September 1, 2013

Threaded Bliss

A Pair of 18th-Century Cotton Dimity Pockets

white cotton dimity pocket
A pair of cotton dimity pockets.

How many of you reenactors and costumers have found yourselves discussing the layers of your 18th-century clothing with inquisitive visitors, only to reach the subject of your pockets and feel your face flush with embarrassment as you're obliged to pull out that ONE ITEM of ugly-fabric machine-made clothing on your body?  You try to conceal the offending article as much as you can whilst still demonstrating its function to your audience, but all the while you're mentally kicking yourself for not having spent the extra time to make a hand-stitched accurate example.

Yes, that's me.  After finding myself in this awkward position no less than three times at
the OSV reenactment a couple of weeks ago, I have finally reached my breaking point and decided that my old, icky cotton drill pockets are no longer acceptable.  They represent one of the first pieces of 18th-century clothing I ever made years and years ago, and I did them quickly on the machine to try to save time, assuming, of course, that "no one will ever see them, so who knows they're machine-made but me?"  What worked for me then simply doesn't cut it any more!  Yes, they have served their function well over the years, but YES, it is high time they're replaced!  If I can completely hand-sew my stays and even make my own shoes, for heaven's sake, there's just no excuse not to have hand-sewn pockets that I can demonstrate at programs with confidence!

So motivated by the three-times-too-many experience at OSV and inspired by Samantha's own recent pocket reincarnation, here's my brand new set of pockets, now perfectly prepared to be exposed to public inquiry!

white cotton dimity pocket
Extant pockets appear both singly and as pairs.

The pattern: The shape of 18th century pockets is pretty consistent across most extant examples and images.  Basically, it's just a long vertical rectangle with corners rounded at the bottom and then shaped to narrow slightly towards the top to minimize bulk around the waist.  It's such a simple, geometric shape that I just drew it free-hand right onto the fabric, using measurements from museum examples as my height and width guides.

Inspirations: Many surviving pockets are beautifully and heavily embroidered; indeed, this is probably the reason they were treasured and preserved through the centuries.  There are, however, a handful of utilitarian examples in museum collections, and these are a lovely testament to the fact that the every-day working woman did not always have the time to devote significant effort to embellishing a functional piece of clothing that no one but she would ever see.  These plainer extant pieces are, arguably, more representative of 18th-century pockets than their more pretty embroidered sisters.

In her own post about her new pockets, Samantha highlighted three excellent examples of these plain pockets, and these likewise served as primary sources for my own reproductions here.  One is a white cotton-linen dimity pocket, dated 1785-1810, in the collection of Colonial Williamsburg (acc. no. 1964-411).  This particular pocket uses different fabrics for the front and back and is lined with a third fabric.  It is bound around the edges with white linen tape.  The top appears to have a casing through which to insert a tape to suspend it around the waist.

Cotton-linen dimity pocket, 1785-1810 (CW acc. no. 1964-411).
Image linked from the Colonial Williamsburg E-Museum.

Samantha's excellent sleuthing also unearthed another white dimity example, this one presumably a full cotton.  It is dated to the late 18th century and is similar in shape to the CW example.  Its edges are also bound with linen tape, but instead of having a channel to insert a tape tie, this pocket is finished with a tape binding across the top and seems to have tape ties tacked to either side of the top.

Cotton dimity pocket, late 18th century (MFA acc. no. 48.356).
Image linked from the MFA online listings.

My third inspiration source, which Samantha also provided a link to in her post, is another white dimity pocket, this one owned by Abigail Adams.  What specifically interested me with this particular source, however, is a citation the author listed in the description of a letter written by Abigail Adams to Thomas Jefferson on 10 July 1787.  Adams writes asking for reimbursement for "diaper for pockets."  This reference is what dictated my choice in fabric.

Check out the 18th Century Notebook page on pockets for a multitude of additional varied examples.

Construction details: Based on the several extant examples I've read specifics on both in books and online, there seems to have been a couple of different ways to construct a pocket.  Not knowing exactly how the CW and the MFA examples were constructed, I took the details I had on other pockets and combined them when putting together mine.

To ensure maximum strength (I keep all sorts of period and non-period stuff in my pockets at events, from a cup-and-ball game for the kids to money (period and plastic) to my camera and cell phone!), I did a reinforced seam around the edges and then top-stitched the tape over this to finish the edges.  The top is finished with a tape binding that is the same as the waistband tape.  This means that the pockets are not adjustable (I can't slide them along the tape to change where they sit on my hips), but I'm okay with that.  Based on my research, it was pretty evenly divided between single pockets with tape channels, single pockets with tacked-on tapes, and a set of pockets tacked to the same tape waistband.

white cotton dimity pocket
Detail of the access slit.

Because my fabric is a medium weight and can very easily support the weight of the pocket contents on its own, I didn't feel it was necessary to line my pair.  Many of the lined examples are only lined in front anyway to help protect the back side of the embroidery from being chafed by items in the pocket.  Since that wasn't an issue here, I just did mine with a single layer.

white cotton dimity pocket
The tape-edge of the pocket.

The fabric: A white diaper-weave cotton dimity from Burnley and Trowbridge.  They are unlined and the edges are bound with white cotton tape.

white cotton dimity pocket

Finishing the look: Pockets, no matter how elaborately decorated, should always be worn under the outermost layer of clothing, concealed from view.  Occasionally, you will see period images where a woman's gown has been pulled back and the edge of her pocket is sticking out, indicating that she is wearing it over her petticoat, but still under her gown.  In general, though, a lady's pockets should not be seen.

Francis Wheatley's "Fresh Gathered Peas," one in the
"Cries of London" series exhibited between 1792-5.
You can see the woman's pocket peeking out from beneath her pulled-back gown.
Image linked from www.spitalfieldslife.com.

Pockets are tied around the waist, usually over the stays to allow easiest access, and can be worn either singly or as a pair.  I've chosen to sew a pair onto a single waistband so that one pocket can contain my modern accessories during events, and the other can be filled with period goodies and can thus be pulled out for inspection by public eyes!

white cotton dimity pocket
I love my new pockets!