
Reproducing the Costume Close-up Jacket, 1775-1785:
A Step-by-Step Guide
Part One
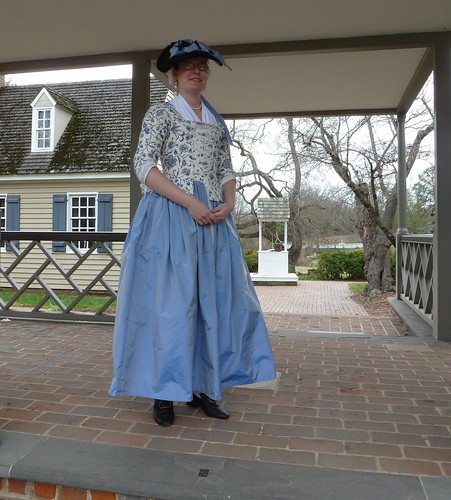
A reproduction of the Costume Close-up jacket, laced with ivory
silk ribbon and paired with a blue/ivory changeable silk taffeta petticoat.
Photo taken at Colonial Williamsburg, December 2011.
Probably one of the most frequently reproduced extant garments amongst eighteenth century costumers and re-enactors is the 1775-1785 French cotton jacket (CW acc. no. 1962-259) featured in Linda Baumgarten’s Costume Close-up (pgs. 39-42). For Ashley’s visit to Fort Frederick a couple of years ago, I reproduced this jacket using the pattern and construction details in the book, supplemented with photos I’d taken of the jacket in one of the study drawers at Colonial Williamsburg.

The original jacket featured in Costume Close-up (CW acc. no. 1962-259).
Photo linked from the Colonial Williamsburg E-museum.
For additional photos of our own, see this earlier post.
Since I made that first jacket for Ashley, I’ve since made two more for myself using that same pattern: one in a tri-color cotton block print for camp wear last spring, and the other (which I started last Thanksgiving weekend and finished almost exactly a year later, pathetic I know) in a Dutch chintz reproduction fabric. Considering the popularity of this jacket’s style (today, though not necessarily in the last quarter of the 18th century - that's still a matter of debate!), it’s relative ease of construction, and the fact that it’s just downright cute and fun to wear, we’ve decided to do a detailed step-by-step tutorial on how to reproduce "The Costume Close-up jacket" from the book pattern through to the final stitch and the proper way to wear it. Using the original jacket as the guiding document source, our goal here is to lead you through to create the most accurate and exact reproduction garment possible, utilizing only the hand-sewing and period construction techniques used in the period (though we will be using a pattern rather than draping, since this is intended to be an exercise in reproduction!). We hope this guide will prove useful to those who have hitherto been wary of attempting period clothing from scaled patterns, and hope it will encourage you to start sewing!
This is the first full tutorial I've ever attempted, so please feel free to let me know if I can clarify anything along the way. In offering this tutorial, I don't claim any kind of expertise; everything I describe here is what I've gleaned from personal research - books, examining extant garments, and experience; outside of a single workshop on stays, I freely admit to being entirely self-taught. That said, I strive to gather as much information as possible before pursuing a project like this, and I've done my best to provide the most historically-accurate construction process possible. If there's anyone more knowledgeable than myself who would like to contribute something further or offer any suggestions or corrections to this tutorial, I'm always pleased and grateful to welcome your input!
The pattern: A scaled drawing of an extant jacket in the collection of Colonial Williamsburg, accession number 1962-259, included in Costume Close-up, by Linda Baumgarten, pgs. 39-42. The jacket is French in origin, but fashions were swiftly carried across the Atlantic and similar styles were certainly worn simultaneously in the colonies. Its silhouette and fabric date it to 1775-1785.
Enlarging the pattern:
Everyone has a different and personally preferred method for enlarging scaled patterns. There's plenty of information available online that describes the various possibilities, so I'll just give a brief description of my approach. My only complaint - and it's a very minor one! - about Costume Close-up is that the patterns aren't given on a full grid (as they are in Patterns of Fashion, for instance). When reproducing something from this particular book, then, I find it easiest to draw in my own grid, and then enlarge the pattern by hand onto gridded paper from there. It's slow going, but I think the extra time is worth it if you're looking to make as true and exact a reproduction as possible. Of course, if you know you'll need to change the pattern significantly to fit yourself, a meticulous scaling-up process like this might not be necessary or even practical, and you might prefer to try an alternate method that allows you to capture more generally the shape and key proportions of the pattern. Luckily, the original pattern fits me exactly in the body and very closely in the sleeves, so enlarging the original and sticking as close to its lines as possible makes sense for me.
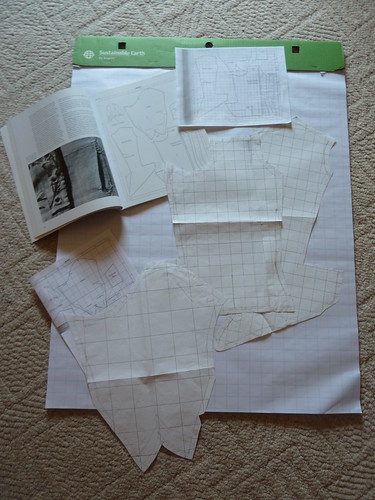
The process of translating the scaled pattern of the original into its actual size.
Be sure to make a muslin of your pattern and to make all necessary adjustments on it so that your pattern is finalized before you begin cutting your fabric. Though a slightly less formal garment than a gown, a jacket like this should still be worn over stays, so do your pattern fitting and alterations wearing them. Baumgarten speculates that the original jacket was worn with a stomacher, so a gap of a several inches at the center front should be retained as you fit your muslin. The jacket could also be worn without a stomacher, the gap laced across either bare stays or a neck handkerchief. Period images indicate it is also appropriate to have the jacket closed at center front, so if you'd like to make the edges lace closed entirely, just add in the extra width to accommodate that as your tweak and finalize your pattern. There are many options with this pattern, which is yet another reason why I love working with it.
Selecting the fabric: The original jacket is made of a block-printed and "penciled" cotton quite similar to some which can be found in the billet books of the Foundling Museum (which you can see in Dress of the People and Threads of Feeling, both by John Styles). Because jackets took considerably less fabric than full-length gowns and were more stylishly and closely tailored than bedgowns, they were a popular choice across many social levels. Middling- or even upper-class women might choose to wear a fine printed cotton or silk jacket for undress, while such a garment might be a way for a working-class woman with less to spend on her wardrobe to still achieve a fashionable appearance in a more practical and affordable way. Because of the small amount of fabric they require, jackets like this one could also easily be cut from the fabric of an old, disassembled gown.
When selecting your fabric for this project, as always consider the social level you intend to represent. In the case of a jacket with only a yard or two of fabric, though, there is a reasonable amount of leeway and you can have a lot of fun in devising stories to explain your possession of certain exotic or expensive fabrics if you portray a woman of lower status. Making and wearing a garment like this can be a fantastic way to open up all sorts of conversations with visitors, guests, and students about not only fashion and clothing construction, but also about consumer culture vs. recycling with expensive items like textiles, the geographic origins and circulation of goods, and the cross-pollination across social classes that took place on so levels.
For my jacket, I wanted a cotton print similar in style, scale, and coloring to the original. I also wanted a print that could appropriately be either dressed up with a silk petticoat (for middling daywear) or dressed down with a linen one (for a "best" working class outfit). When I was searching for fabric over a year ago, the October before last, there was very little available in the way of prints (neither B&T nor Wm. Booth had restocked their cottons at the time), so I went searching for an Indian block print. That let me to Time Traveler Textiles, where I was thrilled to find some of the Den Hann & Wagenmakers' "Wilhelmina" design in blue/mauve/ivory available at an affordable price, so I opted for that (Wm. Booth has since ordered a bunch of gorgeous prints - including this one - from DH&W and Duran, if you're interested in something similar).
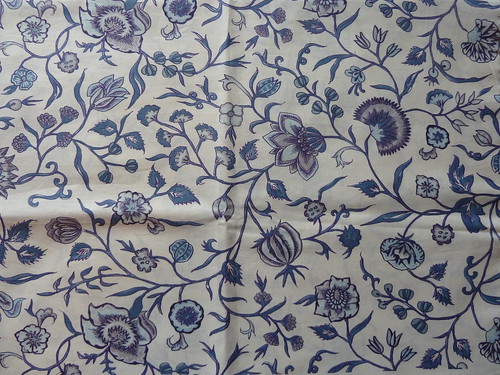
of an 18th-century Dutch chintz found on an extant jacket and petticoat.
One final note on fabric before I get into the construction details. If you ever intend to wash your jacket, be sure to pre-wash your fabric before you cut it because it will shrink (trust me, I speak from experience...!). The one exception might be a chintz like the one I've chosen, which is treated with the light, shiny glaze that gives the fabric its name. Washing it will remove the glaze, so if you'd like to retain that important period detail, consider carefully which is more important for your specific needs: washability or the crisp period textile finish. For this project, I opted not to pre-wash my fabric, but again, that's a personal choice. I don't know the effects of dry cleaning on chintz, whether or not it will shrink the fabric or destroy the finish. If anyone has any experience with that, do please let me know!
Construction details: Because each step will be illustrated with multiple photos (and because this is already an epic post!), I've broken down the construction process into discrete sections that I'll post over the next week. This will help keep things organized and allow those who wish to skip certain steps to do so more easily. The time lapse between the posts for each section are also designed to help give anyone who would like to "sew along" the chance to do so at a comfortable speed. Please let us know if you do decide to sew along because, as always, we'd love to see what you create!
Additional photos illustrating each step can be found on this project's flickr set. The numbers listed in parentheses at the end of each step correspond to the numbered photos from the set.
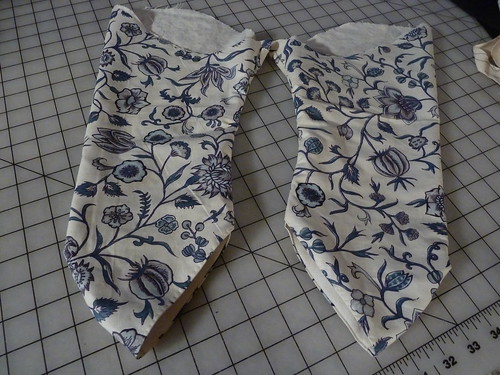
Sleeves:
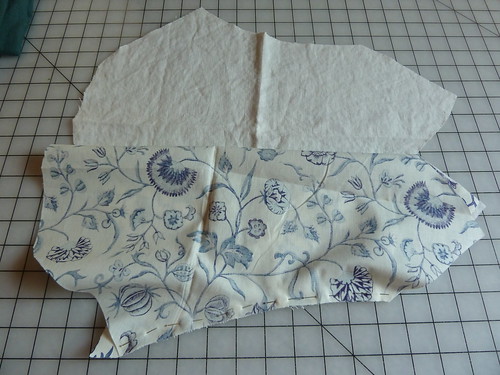
1) Lay each sleeve over its lining, right side of the outer fabric facing up. Bring the side of the sleeve closest to the cap/head over to match the other side, so that only the chintz is folded, right sides together.
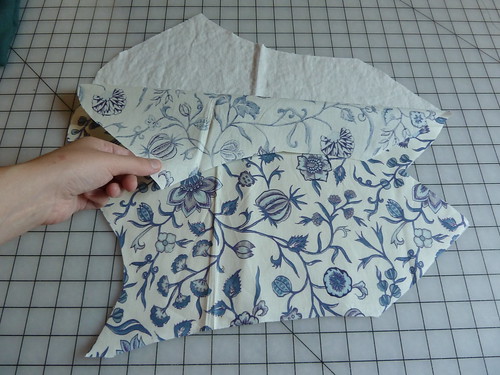
Folding over just the outer fabric...
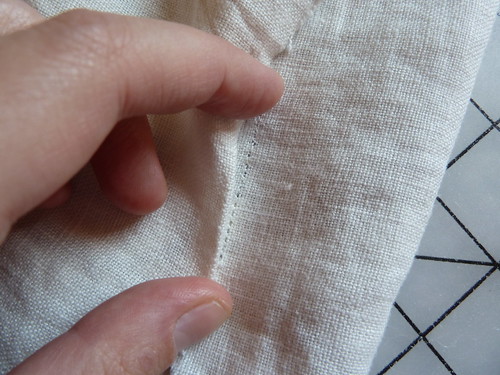
Backstitch a seam through both layers of chintz and the one layer of lining. Leave the bottom 1/2" at the elbow end unsewn. (#4-8)
The sleeve ready to be seamed.

Leave the bottom 1/2" unsewn; this is necessary to ensure you have the
allowance to finish the edge of the sleeves (in a later step).
2) Bring the other side of the lining over to the seam you've just sewn, turn under its seam allowance, and slipstitch it into place to cover the backstitching. Again, leave the bottom 1/2" at the elbow end open. Repeat for the other sleeve. (#9-12)
Cover your backstitched seam by folding under the seam allowance
of the other side of the lining and slipstitch it into place.
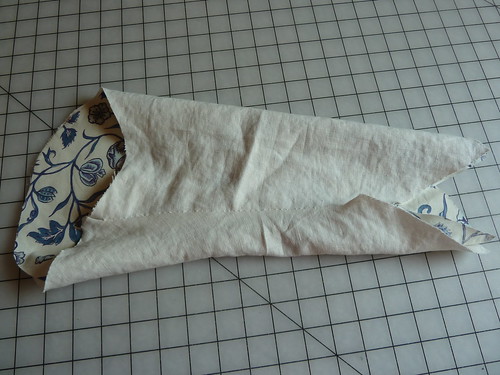
The completed seam.
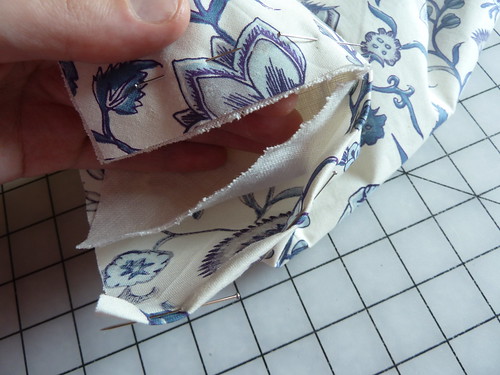
3) On the original, Baumgarten observes that the darts used to shape the elbow were sewn from the right side using a lapped seam (illustrated in Costume Close-up on pg. 39). To do this, first make a small snip - only about 1/4" to 3/8" - at the center of the inverted "V" at the elbow (bottom) of the sleeve.
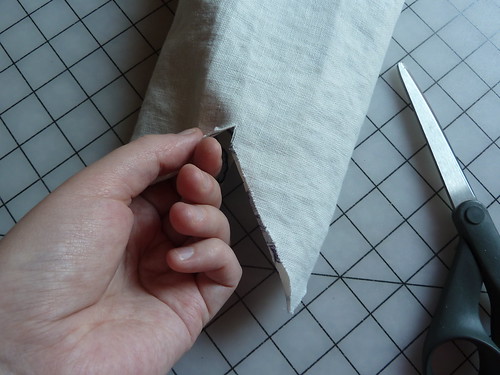
Snipping the "V" to prepare for the elbow dart.
Then turn the sleeve right-side out. Fold under the seam allowance of the outer fabric of one side of the "V". Bring it to overlap the seam allowance of the other side of the "V" and pin it into place; then top-stitch (a spaced backstitch works nicely) through the folded edge of the one side and the outer fabric and lining of the other side. Be sure you do not catch the lining of the first (folded) side in this seam. Again, leave about 1/2" from the edge unsewn, as you did above.
Fold under the outer fabric of one side the "V" and overlay it on top
of the other side's outer fabric and lining.
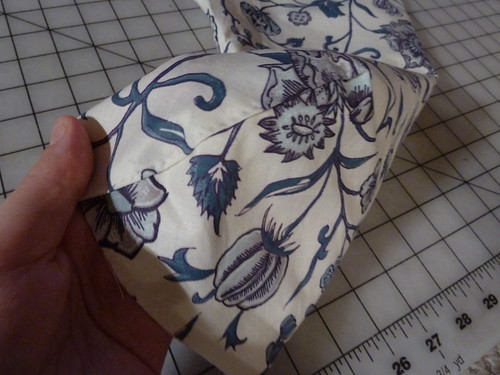
Using a spaced backstitch (or a plain backstitch), top-stitch the
dart to form the lapped seam.
Then flip the sleeve inside-out again. Fold under the seam allowance of the lining that is now hanging loose and slipstitch it over the seam you just made (just as you did in Step 2), leaving the bottom 1/2" unsewn. (#13-20)
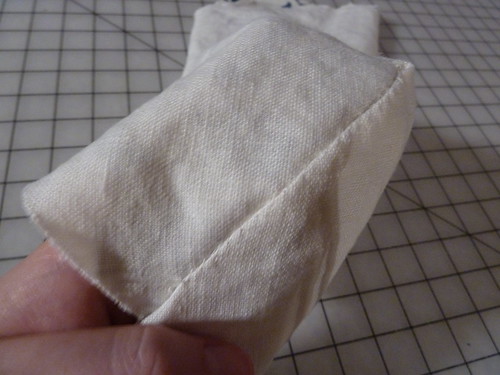
Slipstitch the lining to complete the lapped seam, leaving the 1/2"
closest the edge unsewn.
4) Fold under the seam allowances of both the outer fabric and the lining (i.e. fold them in towards each other, so the raw edges of each will be concealed) about 1/8"-1/4" at the bottom edge of the sleeve. Fold the lining in ever-so-slightly more so that the edge of the outer fabric peeks above it when viewed from the lining side of the sleeve. Using le point a rabattre sous la main, the stitch illustrated by Baumgarten on page 8 and identified as having been used on the original jacket, finish the edges of each sleeve. Turn the sleeves right side out. (#21-25)
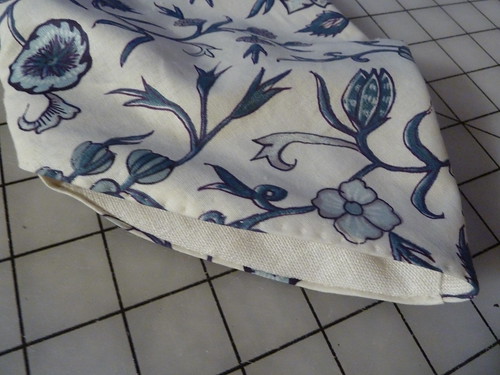
Finish the edges of each sleeve by turning both fabrics in towards
each other and finishing them with le point a rabattre sous la main.
Congratulations, you'd just finished your sleeves!
Coming up in the Part Two of this tutorial: the body of the jacket!
6 comments:
Yesss! I've been mulling over making this jacket for a trip to CW next year. I had found your posts showing the beautiful version you made, and now am thrilled you're doing a tutorial. Hopefully it'll save me from making any major mistakes :-) Thank You!
Thank you so much! Your tutorial so far is really illuminating...and I've made the on-the-spot decision to make my first 1770s-80s garment using it. It's just enough different from the 1790s to present neat learning opportunities with minimal fabric loss in case of disasters :}
Very best,
Natalie
I'm so very glad to know this is proving useful! Good luck with your projects, ladies - I can't wait to see what you create! :-)
What book of patterns did you use? Or if you could give the measurements that would be great..?
J'adore votre blog et je trouve que la majorité de vos articles sont exactement ce que je cherche.
Post a Comment